A cold frame is a rudimentary plant forcing structure used to protect plants. It has no artificial heat added. The temperature inside the structure generally is not more than 5 to 10 degrees above the outside temperature. A mat or blanket may be placed over the frame on cold nights to conserve heat, but this increases temperature by only a few degrees. There are times, however, when a few degrees can be very important.
Cold frames are used to provide shelter for tender perennials, to "harden off" seedling plants or to start cold-tolerant plants such as pansies, cabbage or lettuce earlier than they can be started in open soil. It may also be used to overwinter summer-rooted cuttings of woody plants.
Basically, a hotbed is a heated cold frame. In many ways it is a miniature greenhouse, providing the same benefits with limited space at minimal expense. It is a means for extending the growing season. It is most often used to give an early start to warm-season vegetables such as tomato, pepper or melon. They may also be used to root cuttings of some woody plants.
Location
Hotbeds and cold frames should have a southern exposure to receive the maximum amount of sunlight. To reduce the cost of heating, use a north or northwest windbreak. This may be provided by a building, bales of hay or straw, a tight board fence or an evergreen hedge.
Note
Windbreaks should never shade the cold frame or hotbed.
The site should have good natural drainage so there will not be excess moisture beneath the bed. If the hotbed is below ground level, excellent drainage is essential to keep water from entering or accumulating during heavy rains. If natural drainage is not good, use drainage tile or a thick layer of coarse gravel. If this is not practical, beds may also be built above ground level for proper drainage. However, this will result in a greater heat loss.
Locate beds near the house where they can be given frequent attention (Figure 1). A convenient water supply should be available. If the structure is to be heated electrically, have outlets reasonably close by.
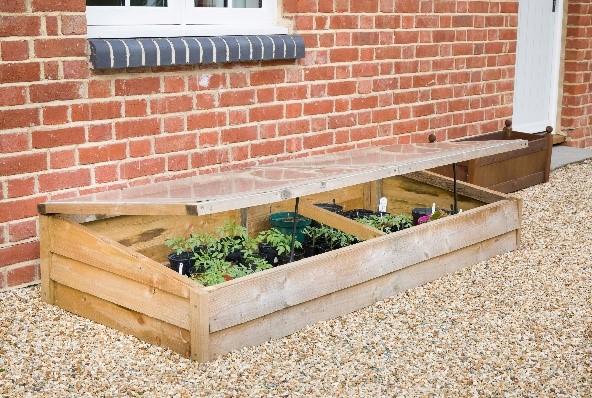 Figure 1
Hotbeds located close to the home tend to received more attention than those further away.
Constructing the bed
Basically, the hotbed or cold frame is a rectangular box with the back higher than the front, covered with a transparent "roof." The size and complexity of the structure depends on needs or funds available. Recycled material such as scrap lumber and old window sashes may be used, thereby reducing costs.
Sash and coverings
The sash available will determine the dimensions for the bed. Glass sash is the conventional frame covering and generally the best. A standard glass sash for cold frames and hotbeds normally is 3 feet by 6 feet. When this is used, the bed should be about 5 feet 8 inches (front to back) by 3 feet or a multiple of 3 (6, 9, 12, 15 or more feet).
Used window sash is satisfactory and less expensive, but the frame dimensions may have to be adjusted.
Note
Remember, whatever the size, the slope from back to front should be 1 inch per foot
If glass sash is not available or too expensive, the frame may be covered with clear polyethylene plastic (4 or 6 mil) stretched on wooden frames. Polyethylene is lightweight and allows construction of many sizes of simple frames. Such frames are lightweight and must be hinged or hooked down to prevent lifting during strong winds.
Unless greenhouse grade polyethylene film is used, it must be replaced yearly. Plastics lose heat rapidly; a double layer with air space between improves heat retention.
Fiberglass may also be used as a covering. Use clear rather than colored panels for better light transmission.
Materials
The sides of the structure may be wood, brick, masonry blocks, concrete or metal. Masonry block, concrete or brick make excellent permanent structures but are more costly than wood. Metal must be well insulated, or heat loss will be high.
Wood is the most frequently used building material for the average home garden hotbed or cold frame. It is easy to work with and more flexible if the bed needs to be enlarged or removed as needs and interests change. For longest durability, lumber should be treated with a preservative that is not toxic to plants. Lumber that has been pressure treated with a non-phytotoxic wood preservative (e.g., ACQ) is suitable for this use. Don't use wood treated with creosote or pentachlorophenol; accumulation of fumes from these materials in a closed frame can cause plant damage. Redwood and cedar are long-lasting woods but are more expensive than pressure-treated wood.
If untreated wood is used, the frame can be painted with a white latex-based paint or white greenhouse paint for added light reflectiveness and wood protection.
One-inch-thick lumber may be used for the frame, but 2-inch has greater durability and insulating qualities. The back wall (generally the north wall) should be at least 18 inches tall, measuring from the top of the heat source. The front wall (generally the south wall) should be about 12 inches tall for a 6-foot frame. Weather stripping at joints helps retain heat and makes the frame more efficient. Use 2 x 4 lumber for corner posts (Figure 2).
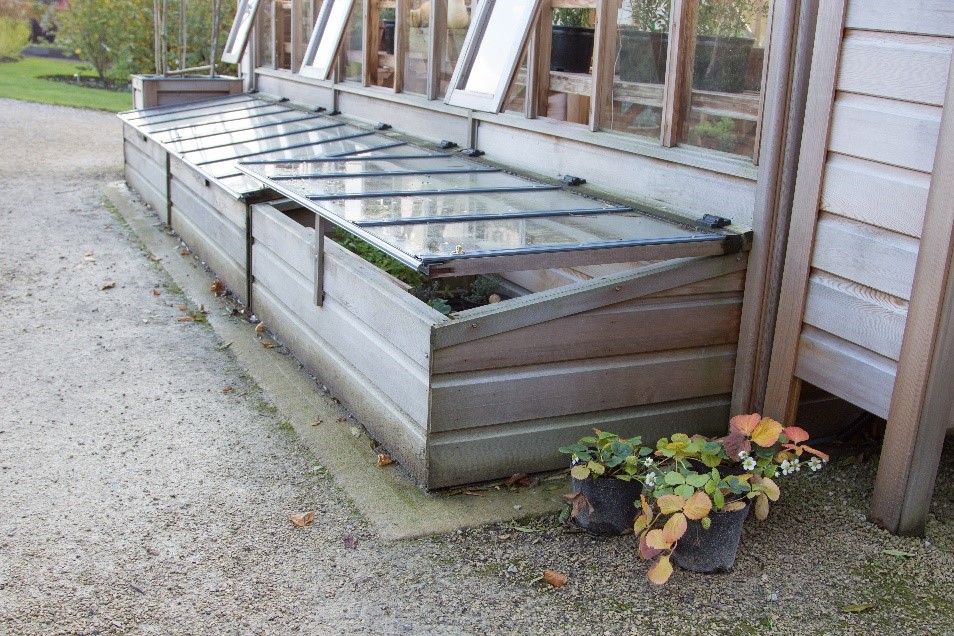 Figure 2
General structure of a newly built frame.
A detailed plan for hotbed construction and heating (PDF)
Preparing the bed area
Prior to its use, the floor of the bed must be leveled. Although temporary frames may be set on the soil surface, excavation is required for more permanent structures. Most home hotbeds are heated with electric coils, but where fresh manure is available, it may be used. A deeper excavation is generally required for establishing a manure-heated bed.
For electric heating, and where some drainage material is required, excavate to a depth of about 14 inches. Corner posts should extend to the base of the excavated area, but side walls need only be extended a few inches below the level of the heat cables.
After the bed area has been excavated, place a layer of coarse gravel about 6 inches deep in it. Cover the gravel layer with screening or burlap to prevent sand and soil from sifting down into it. On this, place a 2-inch layer of sand. Sand makes leveling easy and provides a base for the heat coils. Remember that the 12-inch front and 18-inch back are measured from the level of the heating cables. At this point the bed is ready for installing the heating cable.
Heating the hotbed
Methods for heating the beds include manure, electric cables, light bulbs, hot water and steam. Manure-heated beds are of interest as a means of conserving energy. Temperature control in manure-heated beds is more difficult than when beds are heated with electricty. Therefore, plant growth normall is better in plants in electrically heated beds. The manure-heated bed is suitable for only short periods in either spring or fall. The electrically heated bed can be used for any time period or even throughout the entire winter.
1. Manure
Manure provides heat from the microbial activity that occurs when it decomposes. When available, it represents a cheap heat source. Temporary hotbeds have been made by simply placing the board frames on top of a flat pile of manure 8 or 9 feet wide and 18 to 24 inches deep. Additional manure is banked around the sides of the frame for insulation and heat retention (Figure 3).
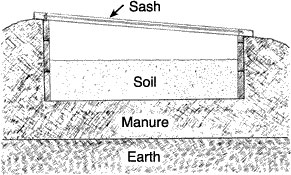 Figure 3
Structure of hotbed built on a pile of manure.
Since this method requires large quantities of manure, it is not generally practical. Heat can be used from smaller amounts of manure packed in a pit beneath the frame.
The manure-heated hotbed provides a means for starting plants several weeks earlier in the spring than they could be started outdoors. It is built exactly like any other frame except that the pit beneath is made 18 to 30 inches deep to hold the manure.
Excellent drainage is needed
If the manure layer becomes soaked with water, decomposition stops and little heat is produced. Fresh horse manure containing about one-third straw is excellent, but other manures may be used.
Note
Manure from animals fed hay or forage treated with a broad-leaf herbicide can damage sensitive plants such as tomato.
To prepare for the manure-heated bed, collect the manure into a pile about 10 days before the bed is to be started. Compact and allow it to remain until heating starts. Then turn the pile, compact it and allow it to remain undisturbed until heat is emitted for a second time. At that time, the manure will be ready to pack into the pit beneath the frame.
Place the 6-inch layer of coarse gravel, as previously described if there are drainage problems, or run tile out of the pit to release any water as it enters. Tamp down the manure so the total depth of manure is 12 to 18 inches. Be sure to pack edges and corners as well. Next, cover the manure with a layer of good soil 4 to 6 inches deep (Figure 3). Allow to remain for several days. The soil temperature may reach well beyond 100 degrees Fahrenheit. Wait until soil temperature drops to about 85 degrees Fahrenheit before planting seeds or moving in plants. Use a soil thermometer. If the temperature starts to rise, always the open sash promptly.
2. Electric heating cables
Since most gardeners do not have adequate amounts of fresh manure available, electric heating cables are the most convenient and dependable means for heating hotbeds. Cables covered with either lead or plastic give good results when used properly.
Cables vary in length and wattage rating. Some are 30, 60 or 120 feet long with about 6.7 watts per foot. Others are in lengths of 6, 12, 24, 36, 48 or 96 feet with about 3.5 watts per linear foot. Other combinations of length and wattage may be available in some areas.
Cable is installed so as to produce a certain number of watts per square foot of bed area. Generally, in milder climates, such as Missouri's Bootheel, 10 watts per square foot of bed space is adequate. Throughout the remainder of the state, 12 watts or more per square foot should be used.
Lay the cable on loose, level soil or sand with the bed prepared as previously described. Be careful not to damage the covering of the cable when handling. Avoid kinks that could damage or break the cable, and don't cross a cable over itself.
Note
Never cut the cable to shorten its length.
The spacing between the loops of cable is important and determines the number of watts that are supplied per square foot of bed. Use the following formula to determine the spacing between loops:
Spacing (inches) = (12 x watts per foot of cable) ÷ wattage required per square foot of bed
To determine the watts per foot of cable, divide the total number of watts for the cable by its length in feet.
Example
Spacing for a 400-watt cable 60 feet long to produce 10 watts per square foot of bed area would be:
Spacing = (12 x [400 ÷ 60]) ÷ 10
= (12 x 6.7) ÷ 10
= 8 inches between loops
The factor used here is 12, but spacing can easily be estimated for 12 watts per square foot of bed area. The number of watts per foot of cable (as 6.7 in the above) becomes the same as the spacing needed between loops (which would be 6.7 inches in this case) when the number 12 is substituted for 10 in the above formula.
If the heating cable is too long, use spacing slightly closer than calculated, but always distribute the cable uniformly throughout the bed. Irregular spacing makes even temperature control difficult. Generally, a 60-foot cable should heat about 36 square feet of bed area.
After the cable is positioned, cover with sand or fine soil. Over this, place half-inch-mesh hardware cloth. The hardware cloth protects the cable from damage when soil above it is being worked for planting. Over this, add the layer of soil for planting.
Thermostats
A thermostat is necessary to maintain uniform temperatures. Some cables have built-in thermostats that keep the soil temperature close to 74 degrees Fahrenheit. For larger beds, a separate, adjustable thermostat is best.
Thermostats in general use have an operating range between 30 to 120 degrees Fahrenheit. They have a remote temperature sensor that should be buried beneath about an inch of soil midway between two loops at the center of the bed. Don't allow the sensor to come in contact with the heat cable.
3.Other heating methods
Light bulbs are less expensive but also less satisfactory as a heat source. However, they can provide a quick and easy means of adding supplementary heat on frosty nights in early spring. About four 25-watt bulbs should be adequate for a 3 x 6-foot frame if spaced around the sides. Use waterproof wiring and sockets. If more heat becomes necessary, these bulbs can easily be changed for larger wattage bulbs. The transition to LED and other energy-efficient bulbs makes supplying enough electrical energy challenging.
If ground-level basement windows are present, it may be possible to build the frame outside such a window, which, when open, would provide some supplemental heat from the heated basement. Hot water and steam systems are normally useful only for large commercial hotbeds and are seldom used for the average home hotbed. Soil piled around the outside of the frame provides added insulation and heat retention.
Operating the hotbed or cold frame
Regardless of the method of heating or type of construction used, the hotbed or cold frame must have proper temperature control, ventilation and watering.
Temperature
A soil temperature in the hotbed of between 70 to 75 degrees Fahrenheit is ideal for planting most seeds. In the manure-heated bed, seeds may be sown while the soil is slightly warmer, but once seedlings appear, good ventilation is necessary to keep the seedlings from becoming soft and weak if temperatures are still high.
Once seeds have germinated, temperatures should be adjusted for the type of plants involved. They can be divided into two groups: cool-season and warm-season crops. The cool-season crops include those that require a relatively low growing temperature. Plants in this category are lettuce, onions, cabbage, broccoli, cauliflower, larkspur, pansy, bachelor button, primula, snapdragon, sweet pea, stock and many perennial garden flowers being started from seeds.
Crops requiring higher growing temperatures include tomato, pepper, eggplant, sweet potato, muskmelon, watermelon, squash and cucumber, as well as many annual garden flowers.
Regardless of the group, most seeds can be germinated in a soil at about 70 degrees Fahrenheit. The warm-season crops germinate a little better if the soil is about 75 degrees Fahrenheit, while the cool-season crops could be kept at 65 degrees Fahrenheit. Where this differential is not possible, the 70-degree temperature is a good compromise.
The more critical temperature period begins after seeds have germinated. This is when air temperature becomes more important. Cool-season plants prefer an air temperature of 65 to 70 degrees Fahrenheit in the day, with 55 to 60 degrees Fahrenheit in the night. These plants will not be hurt by slightly lower temperatures. In spring it is not always possible to keep daytime temperatures this cool, but pay attention to night temperatures, which are more critical.
Warm-temperature plants should be kept at air temperatures between 65 to 75 degrees Fahrenheit during the day and not be exposed to lower than 60 degrees Fahrenheit at night.
In the cold frame, little temperature control is possible. Covering the glass with pads or straw on exceptionally cold nights with careful daytime ventilation are the main methods for heat conservation and control.
Ventilation
When ventilating the hotbed or cold frame, raise the sash on the side opposite that from which the wind is blowing. This prevents wind burn on young, tender plants or lifting of the sash by strong winds.
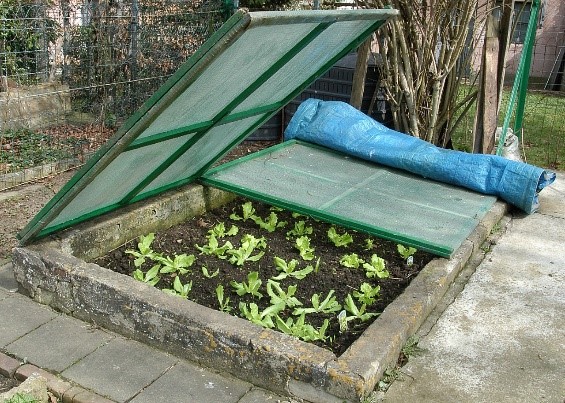 Figure 4
Proper ventilation is important for optimum plant growth. Note blue insulative cover used for extra protection on very cold nights.
During extremely cold weather, provide extra protection and conserve heat by covering the sash with mats or a layer of straw. These must be removed when weather clears and temperatures rise. Glass must be cleaned when straw is removed to provide maximum light transmission.
On warm, sunny days the sash may be opened wide or totally removed (Figure 4). A thermometer is the best guide to determine what width of opening will allow proper air movement for good temperature control.
Cold frames are ventilated in about the same way as hotbeds. Since they are solely dependent on natural heat absorbed during the day, it is important to close the sash promptly in the late afternoon or evening after there is no danger of excess temperature buildup.
Watering
Proper watering promotes good growth and prevents disease buildup. Frames should not be widely opened for watering at any time when the temperature outside is below freezing. Watering should be done early enough in the day so that foliage dries before nightfall or before the frames are tightly closed.
In general, little watering is necessary while plants are small and temperatures are cool early in the season. As the season progresses, plants become larger and temperatures higher, so frames must be opened longer and wider. This means that frequency of watering must also be increased.
Always allow the soil surface to dry between waterings, but do not allow wilting. Occasionally, after several cloudy days are followed by bright, sunny days and higher temperatures, these tender plants will wilt. This is not an indication that the plants need water unless the soil is obviously dry. If the condition is severe, misting over the foliage or providing temporary light shade may be beneficial.
Soil pasteurization
The hotbed or cold frame should contain 4 to 6 inches of good garden soil for growing the seedlings. Weed seeds, insects and diseases are found in ordinary garden soil. Fumigation or soil pasteurization are helpful in reducing problems and maintenance.
For small beds, bake soil in a 140 degrees F oven for 30 minutes before placing into the beds, or if this is not possible, hot water may be poured on the bed to provide some pasteurization. Hot water is hard on soil structure and must be done well in advance of planting so that the soil can dry adequately and be worked well before planting.
In most cases it is more convenient to sow seeds in flats or pots filled with a commercial growing medium, which are then placed in the hotbed. In this case, the soil layer is not essential and the flats or pots may be placed on the sand directly above the coils.
Fertilization
There is generally no need for addition of fertilizer in the seedbed preparation. If the fertility of the soil is not known, it would be beneficial to have a soil test run and appropriate additions made. After seeds have germinated and developed their first true leaves, a light addition of liquid fertilizer should be made. This should be repeated at about two-week intervals while the plants are in the frame.
Pests
Remember that your hotbed or cold frame contains some of the most lush, soft plant growth available to insects in early spring. They are attracted to it. Therefore, keep a close watch for pests and apply appropriate controls before plants are seriously injured.
Hardening plants
Plants started in a hotbed and especially those started indoors should be "hardened" before they are moved into the garden. A cold frame is an ideal place to accomplish this. The hotbed may also be used.
To harden the plants, gradually expose them to the sun and wind first by keeping the sash open wider and longer each day as well as at night if nights are not too cool. Gradually the length of time and amount the sash is opened are extended until it is removed. However, be ready to return the sash in case of a sudden late spring freeze.
Other uses
Hotbeds and particularly cold frames may be used to protect tender plants during winter. For example, tender varieties of chrysanthemums may be lifted from the garden after flowering and set into the cold frame to overwinter.
For other slightly tender perennial flowers, a portable cold frame may be placed over the plants directly in the garden where they are growing. The entire structure can then be removed in the spring. Plants that may benefit from such protection in some areas include poppy anemone, foxtail lily, hardy gloxinia, some lilies, oriental poppy and viola.