African violet
Outstanding among small, flowering potted plants, African violets in a good location should flower without interruption for years (Figure 1). In addition to their free-blooming character, they are well adapted to home conditions, easy to propagate and available in a wide range of flower colors. Miniatures as well as more compact standard varieties are usable in limited space.
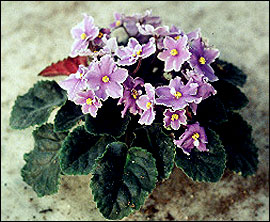
Figure 1
African violet.
Care of the new plant
- Maintain night temperatures between 65 and 70 degrees F; day temperatures 10 degrees warmer. Do not expose to temperatures below 60 or above 80 degrees F.
- Place in windows with bright light but no direct sunlight. Some midwinter sunlight is not harmful, but avoid it at other times of the year. If no suitable window space is available, plants grow well in fluorescent light. Place about 8 to 12 inches beneath cool white fluorescent tubes lit about 14 hours daily.
- Water frequently enough to keep soil moist, but allow slight drying between waterings. They are easily killed by excess soil moisture. Wick watering is adaptable.
- Humidity is important. In homes with low humidity, place on trays of gravel containing water. Home humidifiers can help.
Reblooming African violets
African violets rebloom easily in the home. If located properly and watered regularly, little need be done besides occasional fertilization. Use either special African violet fertilizers or a houseplant fertilizer high in phosphorus. A very dilute fertilizer solution at each watering keeps growth constant and eliminates any chances of over fertilization.
Pale green leaf color may indicate too much sunlight or low fertility. Do not use water softened by a system using salt in the process.
African violets seldom need pots larger than 4 inches in diameter. The danger of overwatering and development of root and crown rots increases if pots are too big.
Old plants sometimes develop long woody stems. The tips of these plants may be cut off and rooted to form new, more compact plants. However, plants developed from leaf cuttings are generally more vigorous and bloom more abundantly.
Amaryllis
Amaryllis (Figure 2) produce large, showy flowers before most of the foliage develops. Large bulbs produce two stems of flowers; smaller bulbs usually have only one. Bulbs ready for bloom or plants with bloom stalks started are available in early winter. With proper care these bulbs bloom yearly.
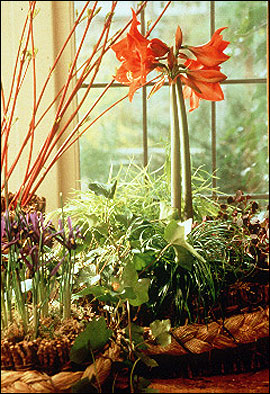
Figure 2
Amaryllis.
Care of the new plant
- When in bloom but before foliage develops, display in any desirable location indoors. However, as foliage develops, move plants to a bright window. Direct sunlight can shorten the life of the flowers, but after flowering is completed, give plants a bright, southern exposure with plenty of winter and spring sunlight.
- Keep bloom stalks from excessive stretching and to increase duration of bloom, keep plants in a cool room at night. When this is not possible, stakes may be necessary to keep the bloom stalk upright.
- Soil must be kept constantly moist while blooming. Drying will reduce flower life and cause the flower stalk to bend.
Reblooming amaryllis
Despite its short flowering period, spectacular flowers rebloom easily in future years. Care is most important during spring and summer. After bloom is completed, remove blooms and stalks promptly so no seeds form. Do not damage or cut off any leaves. Place plants in direct sunlight. If the pot is small and the bulb large, transplanting may be necessary. The pot should be at least 2 inches larger in diameter than the bulb. Standard potting mixtures are quite satisfactory. When repotting, avoid as much root damage as possible. Repot before flowering but not after fully developed leaves are actively growing. The completion of flowering is the last time to replant.
Provide good soil drainage; never grow plants in pots without bottom drainage. Keep bulbs at temperatures between 60 and 70 degrees F. After danger of frost is past, potted bulbs may be moved outdoors. If garden space is available, sink pots to the rim. Position in sufficient sunlight where they can be easily watered. Move gradually into a sunny location to reduce or avoid leaf burn. Keep plants actively growing during the summer. As danger of frost approaches, lift out pots containing the bulbs and store in a cool room (about 45 to 50 degrees F at night). Withhold water until the foliage dies. Light is not necessary. Bulbs require a two to three month rest period before growth and flowering begin again.
Flower buds should appear several weeks after moving plants to a warm temperature and watering is resumed. Bulbs that had four or more healthy leaves throughout the summer should be large enough to flower; those with less foliage may not flower. However, with proper care nonflowering bulbs can be redeveloped for blooming in future years.
Azalea
The popularity of potted azaleas has increased rapidly since they have become available throughout the year. Several types are used for forcing, but the care of all of them in the home is similar.
Care of the new plant
- Although azaleas can tolerate normal room temperatures, they will last much longer in cool conditions. Place the plant in the coolest part of the house where temperatures remain from 60 to 65 degrees F.
- Keep the plant in a well lighted location, but avoid full sun while in bloom. Sun directly on the flowers will fade them and decrease their life. After flowering is finished, the plant should be moved to a sunny window.
- Never allow an azalea to dry out. Water the plant by submerging the pot in a bucket or pan of deep water. Remove it when bubbles stop rising. Allow excess water to drain out before returning the pot to the saucer. Never allow the plant to wilt.
- Use a complete, soluble liquid fertilizer about once every two weeks if you plan to keep the plant after flowering is finished.
- Keep faded flowers removed to prevent the development of disease problems and maintain a good appearance.
Reblooming azaleas
Reblooming azaleas in the home is not a simple matter. After flowering has finished, remove withered flowers and keep the plant in a cool, sunny location. Shift the plant to a larger pot if it appears to be potbound. Azaleas need shifting only once every few years. It is unlikely that a newly purchased plant will need immediate repotting.
A good mixture for repotting can be made from three parts acid peat moss and one part soil. With careful fertilization and watering, azaleas can be grown in peat moss alone.
Submerge the potted plants outdoors in May in a semi-shaded, protected spot. Don't neglect it during the summer. It will need water and fertilization regularly. Watch for insect pests.
If foliage becomes yellow or chlorotic, iron uptake may be limited. This can mean root loss from too much or too little water. It can also result from a pH that is too high (soil too alkaline), or it may actually be a lack of iron in the soil. Apply a chelated iron or iron sulphate to correct the situation. Ammonium sulphate fertilizer also helps to lower the pH and maintain the acidity of the soil. Apply about one half teaspoon each of iron sulphate and ammonium sulphate to one quart of water. Apply this to the plants about every two to three weeks. About every third fertilization use a complete houseplant fertilizer instead of the above combination.
Before July 1, shape the plant by removing the tips of rapidly growing shoots. Keep the plant outdoors as long as possible in the fall. Protect it on the first cool or light frost nights, but bring it indoors when hard frost is likely. Place the plant in a sunny, cool room. It needs 40- to 50-degree temperatures from Nov. 1 to Jan. 1. Do not fertilize during this period and water only enough to keep the plant from wilting.
Buds should develop and swell. In January, move to a sunny window in a room where temperatures are near 60 degrees F at night. In a few weeks flowering should begin. If temperatures are excessively high during this period buds often develop poorly and new shoot growth begins. In warmer areas of the state, some of the Kurume varieties may be planted outdoors. None of the Indica, or Belgian, hybrids are hardy here.
Calceolaria
The oval, balloonlike flowers of calceolaria make its common name, "pocketbook plant," quite appropriate (Figure 3). It is usually available as a spring-flowering plant from about Valentine's Day through Easter.
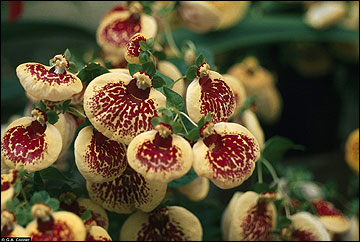
Figure 3
Calceolaria.
Care of the new plant
- These plants thrive in cool temperatures. For the longest display, locate plant in a cool room or window where temperatures are near 50 to 55 degrees F at night.
- Locate in bright light, but avoid direct sunlight, which may fade flowers and reduce their life span.
- Keep plants well watered at all times with slight drying between waterings. Overwatering easily damages their fine root system.
Care after flowering
Calceolarias are annual plants grown from seeds. After flowering is completed, plants gradually decline and cannot be rebloomed successfully. Excessive heat or drying at any time makes them collapse quickly.
Chrysanthemums
Potted chrysanthemums are the most popular year-round flowering gift plant. They are available in a wide range of colors and forms. Although chrysanthemums normally flower in November, newly developed methods encourage flowering all seasons of the year. Potted mums last several weeks to a month when given proper care in the home.
Care of the new plant
- Place the plant in a window where it gets bright light but no direct sun.
- Check each day to make sure that the soil is moist. Do not allow the plant to wilt, but do not keep the pot sitting in water.
- Keep the plant at temperatures between 60 and 65 degrees F at night. Daytime temperatures may be 10 to 15 degrees higher.
Reblooming chrysanthemums
Chrysanthemum varieties used for flowering potted plants are not usually suitable for Missouri gardens. However, if there is a desire to keep the plant, it may be rebloomed with proper attention.
Florists often pot several plants together. Separate these plants after flowering and repot them individually. Use a 5- to 6-inch pot. Keep these plants well watered and at temperatures close to 60 degrees F. When new shoots appear, move them to full sun and give plenty of water.
In summer, sink the pots outside in a sunny area where they can be given good care. Apply a complete liquid fertilizer about every two weeks. Additional plants can be started by rooting cuttings from the new growth.
To develop large, bushy plants, pinch out the tip of each new shoot when it becomes about 5 inches long. Remove only the soft shoot tips. Do not pinch the plants after Aug. 15.
Keep the plants outdoors as long as possible in fall. When light frost threatens, cover the plants or lift the pots and bring them indoors. They often can be returned outdoors during periods of mild fall weather. When cold, freezing temperatures persist, bring the plants indoors to stay. Place them in a sunny south window. Night temperatures around 60 degrees F are ideal. Day temperatures of 70 to 75 degrees F are best.
Chrysanthemums flower only in response to short days (long nights). Until the color shows in the buds, plants must be kept where they will not be exposed to any light at night from a light fixture. Even dim light for short periods can disrupt flowering. When the buds begin to open, light at night will no longer effect them.
Do not expect plants forced at home to be as perfect as those grown in a greenhouse. Greenhouse conditions are difficult to provide in the normal home.
Hardy garden mums also grow in pots. These are suitable for outdoor planting. Set them out in a sunny, well-drained location in spring when the ground is warm. To keep these plants low and bushy, pinch out shoots when they are about 4 to 5 inches long. Discontinue pinching about mid-July.
Cineraria
Cineraria is a spectacular flowering plant for use on Easter and Mother's Day. Masses of daisylike flowers in either red, pink, blue, violet or white rise above a nosegay of large leaves. Cinerarias are seed propagated and grown at cool temperatures.
Care of the new plant
- Plants last longest if kept at night temperatures between 45 and 50 degrees F with daytime temperatures between 55 and 65 degrees F.
- Constant soil moisture is critical for maintaining long life. They wilt quickly and can be seriously damaged if soil becomes dry. Water thoroughly to keep soil moisture constant but not too wet.
- Plants need good light but not direct sunlight, where higher temperatures may reduce flower durability. The heat, resulting in rapid soil drying, may also cause foliage wilting.
Care after flowering
With good care, cinerarias should be attractive for several weeks. These plants are grown from seed and are best handled as an annual. Once flowering is completed, they naturally decline and should be discarded.
Cyclamen
Cyclamen is available from Christmas through the spring holidays (Figure 4). Leaves are heart-shaped, often with attractive gray-green mottlings. Flower petals reflex back from the centers and are held on long stems above the foliage. Colors are pink, salmon, red and white.
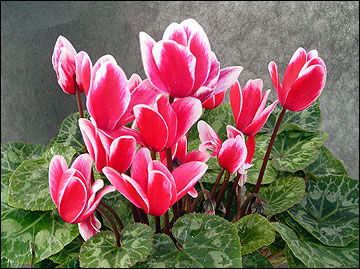
Figure 4
Cyclamen.
Care of the new plant
- Plants may flower for several months if kept at cool temperatures. Night temperatures close to 50 degrees F are best; however, a range from 50 to 60 degrees F is satisfactory. Day temperatures are less critical but should not run over 70 degrees F if possible. High temperatures may cause young flower buds to abort.
- During the winter, place plants where they get bright sunlight. At other times, place in bright light with little or no direct sunlight.
- Never allow plants to wilt. Water from the side of the pot, so water does not get into the center of the "bulb." Keep soil moist with frequent watering, but do not allow water to stand in saucers beneath the pots.
Care after flowering
Cyclamen is a perennial plant and may rebloom a second season. After flowering, gradually withhold water until the foliage dies off. This begins the rest period. Do not water for six to eight weeks.
By midsummer, begin watering gradually. Repot if the bulblike corm is fairly large in the pot. When repotting, keep about half of the "bulb" above the soil line. At this time, a lightly shaded, cool spot outdoors, or a cool, shaded window indoors provides the best location. As new leaves develop, resume normal watering and fertilization and move plants to a sunny location. Keep soil moist at all times, and feed with a houseplant fertilizer according to manufacturer's directions. Move plants indoors before danger of frost. Plants treated in this way should rebloom by midwinter.
If young leaves become stunted or curled, a pest known as cyclamen mite may be present. Although insecticides may combat this problem, infected plants are best discarded before the pest can spread to other plants.
Easter lily
The Easter lily is a popular holiday plant that needs little special treatment. Well-tended plants should bloom successively for several weeks in the home.
Care of the new plant
- Keep the plant moist, but be careful not to overwater. Check moisture daily and be sure the pot never stands in water. Root rots can be easily brought on by overwatering.
- Place the plant in a bright location, but avoid full sun.
- Keep the plant in a cool place and avoid drafts.
- When a new flower opens, carefully remove the yellow anthers. This will prevent pollen from smudging the petals.
- Cut off flowers as soon as they have collapsed.
Reblooming Easter lilies
- Outdoors
When all blossoms have faded, reduce watering so that the plant will gradually dry off. Cut off the stem a few inches above the soil after the top dries. In May after danger of frost is past, plant the bulb in a protected place outdoors at a depth of 4 to 6 inches. Often the bulb will produce a few flowers again in late summer or early fall. Easter lilies are not normally hardy in the Midwest but may persist in the garden for several years if placed in a protected spot and covered with a mulch. - Indoors
The forcing procedures seriously weaken the lily bulb. It is not practical to repot them and bring them indoors to try forcing them the following winter.
Gardenia
The glossy, deep green foliage and fragrant, waxy white flowers of gardenia (Figure 5) make it a beautiful plant, but not an easy plant for home culture. Although available at other times, they are primarily potted plants used for the spring holidays.
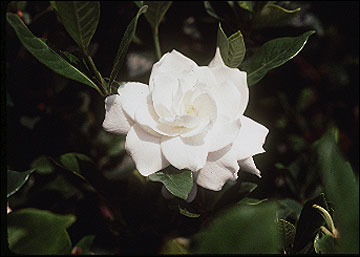
Figure 5
Gardenia.
Care of the new plant
- Plants prefer temperatures close to 60 degrees F at night and 70 to 75 degrees F during the day. Maintain fairly uniform temperatures within these ranges.
- Maintain uniform soil moisture with good drainage. Fertilize with acid reaction fertilizers to keep soil slightly acid. If possible, use rain water, especially if tap water is "hard" or alkaline. Never use softened water because of its high sodium content.
- Place in sunny south or west windows.
Reblooming gardenias
Unless located in a suitable environment, gardenias decline rapidly and should be discarded after flowering. Loss of flower buds is sometimes a problem with new plants. To help reduce bud drop, provide the best conditions possible. Misting over the plant while it becomes adjusted to a new location may help reduce bud drop.
When repotting is necessary, use a slightly acid soil mix high in peat moss. Repot in late spring after flowering is completed. If moved outside for the summer, they prefer a slightly shaded location. Most benefit from the addition of iron sulphate at three to four week intervals. Use 1/2 teaspoon to each quart of water. Soil acidity should be near pH 6.0 or slightly less. In early summer or at the time they are placed outdoors, prune back plants that have become too large.
Plants are subject to attack by common houseplant pests, including spider mites, scale and mealy bugs.
Gloxinia
Care of the gloxinia (Figure 6) is similar to that of the African violet, a close relative. Its large trumpet-shaped flowers rise above large, velvety leaves. Vivid colors include pink, red, white, blue and purple in solid colors as well as spotted or bordered with white. Gloxinias are most popular during the late winter and spring holidays.
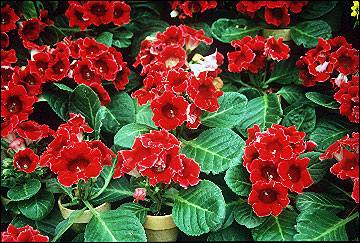
Figure 6
Gloxinia.
Care of the new plant
- Plants need warm nighttime temperatures (65 to 70 degrees F) along with fairly high humidity and good ventilation. Daytime temperatures should be about 10 degrees warmer. Placing plants on a tray of moist gravel or misting over new plants helps adjust them to home conditions.
- Gloxinias need more light than African violets, so place them in a bright window just beyond the reach of direct sunlight. In late spring, direct sunlight may burning the foliage and reduce the life of the flowers. If stems begin to stretch, light is inadequate.
- Keep soil uniformly moist. Plants can be damaged seriously if allowed to wilt. Small flower buds sometimes abort after plants are brought into the home. Either poor light, low humidity or excessive soil drying may lead to collapse of the young flower buds.
Care after flowering
Plants produce a fleshy tuber, which with proper care, may be rebloomed. After the plant has stopped flowering, gradually taper off watering until the leaves yellow and die. Place pot and tuber in a cool, dark location and stop watering. Give the tuber a rest period of eight to 10 weeks. As new growth appears, move the pot to a bright location and begin watering gradually. Tubers may be repotted at this time if necessary.
For spring bloom, do not water the tubers until after Christmas. Then remove the tuber from the old soil and plant shallowly into a new potting mixture. Place the top of the tuber above the soil line. Use only one tuber per pot. For starting plants, pots 4 or 5 inches in diameter are adequate. As shoots enlarge and leaves fully expand, begin normal watering and light fertilization. Plants should begin flowering in about four months.
Young plants may also be started from leaf or shoot cuttings. Techniques for starting plants from leaves are the same as for African violets.
Holiday cacti
Thanksgiving cactus, Christmas cactus and Easter cactus are three tropical cacti that naturally flower near each of these holidays. Recent development of vigorous new hybrids, which flower between Thanksgiving and Christmas and in different colors and shades, has increased their recent popularity. In general, holiday cacti bear the stem characteristics of the Thanksgiving cactus. The Thanksgiving cactus has stem segments with saw-toothed margins; the Christmas cactus has rounded margins. Easter cactus is more intermediate in shape but develops more small spines at the junctions of the stem joints.
Care of the new plant
- Cacti prefer a relatively cool night temperature between 55 and 60 degrees F. Night temperatures above 70 degrees F inhibit flowering and cause drop of existing buds.
- Place in some direct sunshine. Poor light promotes bud drop and poor growth after flowering. In summer, place plants in bright light but not direct sunlight.
- Water thoroughly, but allow to become moderately dry between waterings. Excess moisture results in root rot, especially during flower bud development in the fall during slow vegetative growth.
Reblooming holiday cacti
For flowering in future years, keep plants in a sunny window and fertilize regularly but lightly. Plants are epiphytic, that is, they grow in decaying organic matter rather than soil. When repotting, use sphagnum moss or a very loose mixture of organic materials. They do not need extremely large pots.
Keep in a bright window indoors during the summer, hang from branches of trees or set in other lightly shaded locations outdoors.
About mid-September, flower buds should begin to develop. Night temperatures of 55 degrees F result in the development of flower buds. When cool night temperatures are not possible, induce flowering by giving plants short, preferably nine-hour days, from about mid-September to mid-October. Cover with a light-tight box every evening for 15 hours of complete darkness. Flowering occurs about 2-1/2 months later.
Reduce watering and withhold fertilization during flower bud development and flowering stage.
Plants are relatively disease- and pest-free. However, overwatering or poor drainage of the potting medium may cause root rot and result in collapse of roots. Plants root easily from stem segments. To start new plants, break off the healthy older branches and root the tops in fresh, clean sphagnum moss. Water sparingly until rooting occurs and new growth begins. Wilted segments, if not too badly damaged, will recover and become firm as new roots develop.
Hydrangea
The potted hydrangea is popular for Easter and Mother's Day. With good care it should last several weeks in the home.
Care of the new plant
- Water is the most important factor in caring for a potted hydrangea. The large foliage and flower clusters use large quantities of water. Never allow the plants to dry out. Check the soil several times a day. If you plan to be away for a day or two, cover the plant with a transparent plastic bag so that it will not lose water so fast. This should not be done frequently or it will weaken the plant and increase disease problems. Do not allow the pot to sit in a pan of water for long periods of time. If the plant wilts severely, submerge the soil and pot in a pan of deep water, and allow it to remain until the soil ball is thoroughly wetted. Drain and replace.
- Bright light will help to keep the plant in good condition. Place it near a sunny window but not where it gets direct sun which will fade or burn the flowers.
- Hydrangeas like cool temperatures. Move the plant to a cool room at night (50 to 60 degrees F).
Reblooming hydrangeas
- Outdoors
In warmer areas of Missouri, the potted hydrangea can be planted outdoors in a protected spot after flowering has finished and the weather has warmed up. After mild winters the plant may flower, but after severe winters it will often be killed back and will not bloom. Never prune hydrangea in late summer or fall. At that time flower buds are set, and pruning will remove buds that would produce flowers next year. Mulch the tops with straw or Styrofoam covers to protect from being killed during the winter. - Indoors
To rebloom the hydrangea indoors, cut the shoots back after the plant has finished flowering so that two nodes or pairs of leaves are left on each shoot. Repot in a mixture of equal parts of soil and peat moss. If soil is very heavy, add coarse sand or perlite. Grow the plant in full sun or a south window. In May, move the plant outside and sink the pot where it gets full morning sun but light shade during the afternoon. Water regularly and fertilize with a complete liquid fertilizer about every two weeks. For extra large flower heads, allow only about three stems to develop. When removing extra shoots, take out those that grow toward the center of the plant. Lift the pot occasionally to keep root growth from moving outside the pot. To keep shoots from becoming too long, pinch back shoots during the summer. The last pinch should not be made any later than July. Keep the plant outdoors as long as possible in the fall, but bring it indoors before a hard freeze. Keep the leaves on until Nov. 1 if possible. Then pick off all the leaves by hand or put the plant in total darkness until all leaves drop naturally. The leafless plant must then be kept at temperatures from 35 to 40 degrees F for about six weeks. Keep the plant dry during this period. After the cooling period, bring the plant to a sunny, cool room, with night temperatures of 55 to 60 degrees F. Water it well and fertilize about every two weeks. It should flower in about four months. - Color
The color of hydrangea can be controlled to some extent. Flowers are blue if grown in acid soil and pink if the soil is near neutral. The color of white flowers cannot be changed by this method.
For blue flowers, use a soil mix with liberal quantities of acid peat added. Water the plant three times at 10 day intervals in late summer with aluminum sulphate (seven teaspoons per quart of water). After the cool dormant treatment, again add the aluminum sulphate solution about four more times at 10-day intervals. When fertilizing, do not use fertilizers that contain phosphorous.
To produce pink flowers, keep the soil more neutral (pH 6.5-7.0). If the soil is naturally acid, water with diluted lime water made with 2/3 teaspoon of hydrated lime in a quart of water. Use a complete fertilizer for regular fertilizations and add one teaspoon of superphosphate to each pot. If leaves turn yellow (chlorotic) due to this treatment, use chelated iron or iron sulphate to correct the condition. Use 3/4 teaspoon of iron sulphate per quart of water.
Kalanchoe
Compact varieties of kalanchoes (Figure 7) in a greater range of flower colors have been developed recently. As a Christmas plant, the red-flowered types have been popular, but pink, orange and yellow varieties are available for other times of the year. The kalanchoe has thick, waxy leaves. Flowers are small, four-petaled, in abundant clusters held well above the leaves.
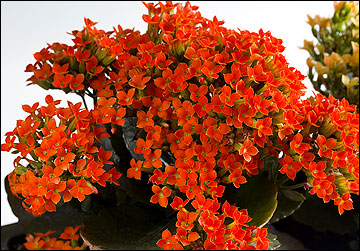
Figure 7
Kalanchoe.
Care of the new plant
- Plants prefer a night temperature from 60 to 65 degrees F. As with most houseplants, day temperature should be about 10 degrees higher.
- Locate the plant in a sunny south or west exposure during the winter. In the summer any bright location with a few hours of direct sunlight will be satisfactory.
- These plants can be damaged by overwatering. Allow soil to dry slightly between waterings. Fertilize with a common houseplant fertilizer at about monthly intervals.
Care after flowering
With good care, kalanchoes may be rebloomed for another season. After flowering, shift the plant to a slightly larger pot. Use a well-drained, general-purpose potting soil. Cut back tall growth and old flower stems. Keep well watered in a sunny, warm window. Indoors, keep the plants in a sunny location, but after danger of frost move them outdoors for the summer. Gradually adjust them to outdoor conditions, so tender leaves will not burn. Keep in a bright, lightly shaded spot. New plants may also be started from cuttings taken in the spring or early summer.
Kalanchoes, like poinsettias, require short day lengths for flower bud development. Natural day lengths between Oct. 1 and March 1 allow flower buds to form. During this time, keep the plant in a room where lights are not turned on during the natural dark hours. About six weeks of natural winter day lengths are required for flower buds to appear. After the flower buds are large enough to be seen above the foliage, day length is no longer critical. At this time, place plants in any location regardless of night lighting. Plants exposed to natural short day lengths in early October should begin flowering by January.
Poinsettia
The red flowering poinsettia is by far the most popular flowering potted plant for the Christmas season. White, pink and variegated white and pink are also available. Many new, long lasting varieties of poinsettias are now available. If properly cared for they may last a month or more after Christmas.
Care of the new plant
- Poinsettias use a lot of water. Check daily. Make sure soil remains moist, but do not allow water to remain beneath the pot in the saucer or wrapping. Too much water will cause the roots to rot, and the plant will deteriorate.
- Keep the plant out of drafts. Excessively hot, dry air from heating ducts will reduce the life of the plant. Also avoid cold drafts. Poinsettias are semi-tropical and can not tolerate cold temperatures or rapid temperature changes.
- Keep the plant where temperatures remain above 60 degrees F. Temperatures between 65 and 70 degrees F are ideal. It is not necessary to move poinsettias into a cool room at night.
- Place the plant in good light but not direct sun.
- Do not allow the plant to wilt. Poinsettias are closely related to many desert plants. Their first response to dry conditions is to drop their leaves in order to cut down water loss.
Reblooming poinsettias
Poinsettias are perhaps the most difficult flowering potted plants to rebloom in the home. Unless there is a special interest to try the technique, discard the plant after flowering.
After blooming, gradually withhold water. The leaves will then yellow and fall. Store the dried-off plant in a cool place with temperatures 50 to 60 degrees F until spring. Water only enough to keep the roots from drying out.
In spring, place the plant in a warm room and prune the stems back to about 6 inches. If there is more than one plant in the pot, divide and repot them at this time.
For repotting, use a well-drained soil. Houseplant potting soils available at garden shops are satisfactory. Or use one part garden soil, one part peat moss or leaf mold and one part sand or perlite.
After repotting, place the plants in a bright, sunny south window until frost danger is past. Sink the pot outdoors where it gets some wind protection but where it gets sun most of the day. Light shade in the hottest part of the summer afternoon is desirable. Lift the pot occasionally to keep roots from growing into the surrounding soil.
As new shoots develop, cut them back to allow two nodes or pairs of leaves to remain. Do not pinch back shoots after mid-August.
Plants may be started from cuttings, but rooting is fairly difficult under home conditions.
Keep the plant in good growing condition by watering and feeding regularly during the summer. Add a complete liquid fertilizer about once every two weeks.
Watch carefully for insect or disease problems and control immediately. Discard diseased plants.
Before the weather becomes cool in fall, bring the plant indoors and place it at a bright, sunny south window. Night temperatures for flower development should be between 60 and 62 degrees F. At higher temperatures flower development will be poor. Day temperatures may be 70 to 75 degrees F.
The poinsettia is a short day (long night) plant. Make sure that it receives no additional light at night while flowers are forming. This critical period begins about Oct. 1 and continues until colored bracts and flower buds are visible. Even short periods of dim light can prevent flowering. If the plant is kept in a lighted room, cover it every night at dusk with a light-tight bag or cover. Remove the cover at about 8 a.m. each morning.
If these procedures are followed carefully, the plants should flower by midwinter.
Potted bulbs
Spring flowering bulbs often forced into bloom in pots are tulip, hyacinth, narcissus (daffodil), grape hyacinth and crocus. For maximum enjoyment, these plants are best purchased in the bud or early stages of bloom.
Care of the new plant
- Place the plants in a cool spot where temperatures at night are about 60 degrees F.
- Do not place them in a sunny location. The warm temperatures in sunshine will speed flower development and shorten the life of the flowers.
- Keep the plants moist but not standing in water. Additional fertilization will not be necessary.
Reblooming potted bulbs
Do not try to rebloom indoors bulbs that have been forced. They can, however, be moved into the garden and will often flower the next spring. Discard any bulbs that have been forced in water such as hyacinths or paperwhite narcissus.
When the bulbs have finished flowering indoors, move the plant to a sunny location. Keep them wet enough so that leaves are able to mature and dry gradually. When the tops have died, remove the dry foliage and soil from around the bulbs. Store them in a dry place until fall, then plant them outdoors in the garden.