Collecting a representative soil sample is an important step in developing a nutrient plan for your farm. The goals of your soil-sampling plan should be to
- Identify manageable sized fields with similar characteristics.
- Accurately and cost-effectively determine the nutrient status of those fields.
With careful planning and execution, representative soil samples can be obtained from your fields. Careful, comprehensive soil sampling pays dividends in smarter management decisions and efficient use of fertilizer nutrients.
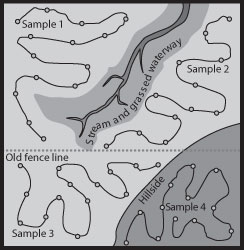 Figure 1
Soil sampling strategy for an 80-acre field.
How should I divide my fields?
The key to collecting a good soil sample is to identify variability within a field and sample accordingly.
- Human activities are the most important source of variation in soil test levels in most hay and row crop fields.
- Differences in crop histories and fertilization patterns can have a large impact on soil fertility levels. Old or existing fence lines can be a good indicator of variation. Look at an older aerial photo of the farm for other hints about past management.
- Nutrient hot spots are often found near old homesteads.
- Natural features such as changes in soil type and topography are typically less important sources of soil test variation except in low-testing and unfertilized fields.
When creating a soil-sampling plan for fields and farms, the objective is to divide fields into areas that you expect to have similar characteristics or you are likely to manage similarly. Typical sampling areas should not exceed 20 acres.
When should I sample?
- The best time to collect soil samples is when the field is idle and enough time is available to plan fertilizer and lime applications for the next crop. Sampling after harvest in the fall and winter usually works best for forages and spring-seeded crops.
- For winter wheat and fall-seeded crops, sampling while the field is idle in the summer works well.
- Preplant or presidedress nitrogen samples for corn should be taken in the spring as close to planned nitrogen application as possible.
Sampling while the field is idle allows you to better identify areas according to soil type, topography, and old field boundaries while allowing easy access to the field.
It is best to wait at least three months after application of phosphorus fertilizer, lime or manure before taking a soil sample. Sample your fields every three to five years. It is also recommended that you sample a field at the same time of year as your last sample because some soil test levels fluctuate during the year.
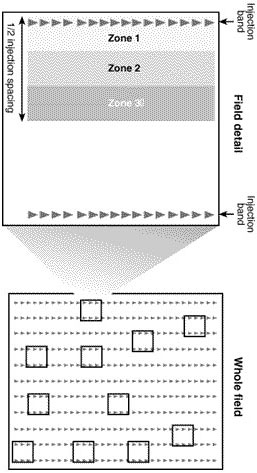 Figure 2
Sampling fields after banded fertilizer applications.
On fields where the location of injection bands for fertilizer or manure is known, the objective is to take 30 cores using the following method:
- At a randomly selected point in the field, take three 6- to 7-inch cores, one from each of three zones adjacent to an injection band. (See figure below.)
- Repeat the procedure at 10 or more randomly selected locations in the field.
- Take the cores at various points in each zone as you move among sampling sites in the field.
On fields where the location of the fertilizer or manure bands is not known, take at least 20 cores, randomly scattered over the field.
Without a sampling method like this, the tendency is to take too many cores over the injection point on fields with banded manure or fertilizer. This causes an overestimate of the value of nutrients in the soil.
How to collect a soil sample
Your objective is to collect from 10 to 20 cores from the area to be sampled (Figure 1). More cores are needed when you expect more variation within the field. Take 15 to 20 cores on fields with a history of manure, banded fertilizer applications and other expected sources of variation. Fewer cores (10 to 15) are needed on uniform fields with a history of broadcast fertilization. It is better to do a thorough job of sampling with more cores per sample less often than to do a poor job more often.
The best approach is to travel across the entire area to be sampled in a zigzag pattern randomly selecting spots to take a core (Figure 1). Sampling depth is 6 to 7 inches for most objectives. Do not take too shallow a sample as this will overestimate the soil fertility level in your fields. Avoid taking cores near gravel roads. Road dust containing lime can raise soil test pH levels near roads, resulting in elevated levels of pH in the soil test.
A separate sample from 0 to 2 inches should be taken in long-term no-till fields to monitor surface pH. Continuous use of broadcast fertilizer can cause nutrients to build up near the soil surface and reduce soil pH. Low surface soil pH can reduce activity in some herbicides, resulting in poor weed control. Applications of lime may be needed to correct this problem.
The equipment you need for soil sampling includes
- A soil sampler; preferably some type of coring device.
- A clean plastic bucket; plastic paint buckets work well.
- A small box or bag; contact your soil testing lab for boxes. Hardware store paper nail bags work well too.
- Map of the field with sampling plan and sample labels.
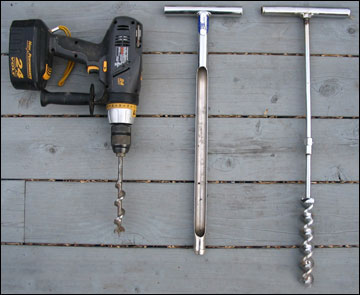 Figure 3
Coring devices are best for soil sampling. Augers are recommended on rocky soils. Hand samplers at least 3 feet long are desirable because they reduce back strain.
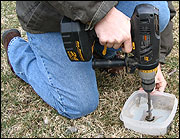 Figure 4
A power drill can facilitate sampling in rocky or dry soils. A plastic container with a hole in the middle will facilitate collecting the soil as the auger pulls it out of the ground. Empty the soil out of the plastic container into the soil sample bucket after each successful attempt to get a 6-inch core.
The best tool for soil sampling is a coring device (Figures 3 and 4). A core sampler works best in soils with few rocks
. In rocky soils, some type of auger is the preferred tool. If you are doing a lot of sampling, a power drill with an auger can be very efficient. A shovel or spade can be used if a coring device is not available. Always use clean equipment when collecting soil samples. A plastic bucket should be used for collecting and mixing samples. Metal buckets or containers can contaminate the soil with micronutrients.
Submitting your soil samples
Break up the soil cores and thoroughly mix the sample soils. Place approximately 1.5 cups of the mixed soil into a soil sample box or plastic bag and discard the excess soil. If the soil is too wet to mix thoroughly, the sample can be set out on a bench and allowed to air dry before mixing.
Label the sample with field and subfield names. Soil sample boxes and soil information forms can be obtained from private soil testing labs or your local MU Extension center or by contacting Extension Soil and Plant Testing Services at the University:
- Soil and Plant Testing Laboratory
23 Mumford Hall
Columbia, Mo. 65211
http://soilplantlab.missouri.edu/soil
Soil samples can also be submitted to your local MU Extension center or directly to a University or private soil testing lab. Be sure to use a lab that has been accredited by Missouri Soil Testing Association (MSTA), http://soilplantlab.missouri.edu/soil/mstacertified.aspx.