Chapter 3 of the Missouri Master Gardener Core Manual
 David Trinklein
Division of Plant Sciences
Plant propagation is the process of increasing the number of plants of a particular species or cultivar. There are two primary forms of plant propagation: sexual and asexual. In nature, propagation of plants most often involves sexual reproduction, or the production of viable seeds. When exposed to proper environmental conditions, these seeds germinate and grow into mature, reproductive plants. Over the years, horticulturists have also developed asexual propagation methods that use vegetative plant parts. This allows plants to be created in ways that nature cannot duplicate.
Sexual propagation
Sexual propagation uses seeds to produce new plants. Sexual propagation is relatively easy and often requires no special equipment. It is nature’s way to obtain many plants economically.
Seeds are formed when pollen is transferred from the anther of a flower to the stigma of a flower and fertilization occurs. In plants that are self-pollinated, every seed produced will carry the same genetic makeup as the original parent plant, barring mutations. In cross-pollinated plants that have two parents, the seed will contain a mixture of genes from the egg parent plant that bore it and the pollen parent plant that was the source of pollen for fertilizing the egg. This continual reshuffling of the genetic "deck of cards" provides for many different gene combinations, thus helping to ensure the survival of a species in a changing environment.
A seed consists of three primary components: the embryo, or undeveloped plant; the endosperm, which stores food; and a protective covering known as the seed coat (Figure 1). For propagation to succeed, it is important to start with high-quality, viable seeds. Seed viability is expressed as the estimated germination rate in percent. While many gardeners might like to economize by saving seed from one season to the next, home-grown seed often has disappointing germination rates because storage conditions required to maintain seed viability are somewhat difficult to maintain. Additionally, a vast majority of horticultural cultivars today do not "breed true" from their own seed; that is, the seed produces plants that may or may not have all the desirable traits of the parent plants.
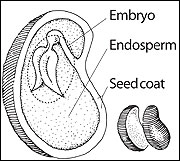 Figure 1. A seed consists of three parts: embryo, endosperm, seed coat.
Seed germination
Seed germination is a complex process that occurs when a viable seed with proper internal conditions is exposed to favorable environmental conditions. Internal conditions that affect seed germination include seed coat properties and dormancy. Environmental factors that influence seed germination include moisture, temperature, air (oxygen) and, in certain cases, light. Ideal germination conditions vary by species, so it is important to know your crop. Information about germination time and other plant characteristics is provided on seed packets.
The gardener’s goal is rapid, even germination. The time for this will vary according to species. Quick crops germinate in five to seven days. Slow crops may take 21 days or more.
Seed coat
Some species of plants produce seeds that are nearly impervious to water. In nature, this characteristic tends to preserve the longevity of the seeds, but it also makes them less likely to germinate immediately after being produced. Most legumes produce such seeds; Robinia (black locust) and Gymnocladis (Kentucky coffee tree) are classic examples. Gardeners can encourage seeds with hard seed coats to germinate by modifying the protective covering. Methods include soaking the seeds in warm water, dipping them in an acid bath for a short time or mechanically wounding (nicking) the seed coat with a file or sandpaper. Choosing which method to use depends on the hardness of the seed coat and the size of the seed.
Dormancy
Seeds of some species of plants contain abscisic acid, a chemical that inhibits germination. For these species, germination occurs after certain changes take place within the seed in response to environmental conditions. In nature, this period of adjustment, called after-ripening, prevents fall-produced seeds from germinating until the following spring when conditions (especially temperature) are more conducive to the survival of newly emerged seedlings. Cool, moist conditions are associated with after-ripening in nature. The artificial exposure of seeds to this combination of conditions to facilitate germination is called stratification. Optimal temperatures for stratification range between 35 and 45 degrees F and vary with species, as does the length of time seeds must be stratified.
Moisture
Most seeds have low water content and require moisture to initiate the physiological processes that lead to embryo emergence. The nature of the seed and its seed coat, as well as the availability of moisture, greatly affects germination success. Species vary in the amount of moisture needed to prompt germination. For example, the cucurbits (e.g., melons and cucumber) and cole crops (e.g., cabbage and broccoli) will germinate in soil with relatively low moisture content, whereas celery requires soil to be well hydrated before seeds will germinate.
Temperature
Plants can be grouped according to how temperature affects germination of their seeds:
- Plants that germinate only at low temperatures.
- Plants that germinate only at high temperatures.
- Plants that germinate over a relatively wide range of temperatures.
Usually the temperature preference of the mature plant indicates which category its seeds fall into. For example, cole crops prefer cool temperatures and bear seed that will germinate at relatively low soil temperatures. Conversely, corn does best in warm temperatures and needs relatively warm soil for germination to occur. Optimum soil temperature for germination of the seeds of most plants is 75 to 80 degrees F.
Air and oxygen
Seeds need air for germination. Seeds must respire to remain viable, and oxygen is necessary for the respiration process. Additionally, oxygen is involved in the initial reactions that trigger germination. Heavy soils that limit oxygen availability to seeds are notorious for poor seed germination. Overwatering after sowing seeds can also adversely affect germination rate.
Light
Some seeds require light to germinate. Others require darkness. This difference will affect planting depth requirements. If small seeds were to germinate deep in the soil, they would probably use up their stored reserves and die before being able to emerge and start photosynthesis. Thus, these small seeds must be at or near the soil surface to be exposed to light, which enables germination to occur. They will emerge and begin photosynthesis before stored food is depleted.
Starting seeds indoors
For earlier maturity and better performance, plants of many annual flowers and vegetables are often started indoors, well ahead of the outdoor planting season. The proper sowing time before outdoor transplanting date varies from four to 10 weeks, depending on the species. Successfully producing seedlings indoors requires a few special considerations.
Containers
Containers for starting seeds should be clean and sturdy and must fit into the space available for growing plants indoors. The proper container helps get seedlings off to a good start and can save work. Plastic trays, flats and pots are widely available for this purpose and work well. Clay pots can be used, but they are more difficult to disinfect between uses. Peat pots and compressed peat pellets are popular biodegradable choices that allow the container to be planted along with the seedling, thus eliminating the shock of transplanting.
Propagation media
The medium used for starting seeds should be loose, porous and fine textured. Prepared propagation blends are commercially available and usually contain a mixture of peat moss, vermiculite and perlite. Vermiculite alone provides for good seed germination; the fine grade is best. Mineral wool cubes and Oasis® are two synthetic materials that can be used as a propagation medium. Avoid using soil or sand alone or in a blend. Soil tends to drain poorly in containers; both soil and sand often harbor microorganisms that could attack seeds or seedlings.
Seedling care
After seeds germinate, the seedlings must be given the best possible growing conditions to ensure stocky, vigorous plants for outdoor planting. Place them in a bright, south-facing window if possible. Alternatively, a fluorescent light fixture with two 40-watt bulbs is adequate; locate the light fixture about 6 inches above the seedlings and turn it on for 14 to 16 hours daily. Most annuals and vegetables prefer night temperatures between 60 and 65 degrees F. Day temperature can be 10 to 15 degrees warmer.
Keep the humidity around the seedlings high and start fertilizing them with a water-soluble fertilizer at half the recommended strength a few days after seedling emergence and regularly thereafter. Fertilizing frequency depends on species, fertilizer strength and environmental conditions. Always use strict sanitation for disease prevention and watch for problems (e.g., diseases or insects). "Damping off" is the most common seedling disease and can be managed by drenching the seedlings with a fungicide labeled for Rhizoctonia, at half the recommended rate for mature plants.
Transplanting
Seedlings are ready to transplant when the first "true" leaves expand. Don’t allow seedlings to grow too large, as this can reduce transplant success. As you prepare, make holes for the transplants in the medium filling the new container. You can use a dibble (see page 5, "Tools for propagation") or any other tool you find convenient, such as a small trowel or even an old knife that has been retired from kitchen use. Just be sure the hole is large enough to accept the root system. Now you are ready to transplant.
Gently loosen the germination medium near the roots of the seedling being transplanted. This can be done with a pencil, knife or finger. Handle seedlings by the leaves only — even slight pressure on the stem can injure or kill a seedling. Lift the seedling from the germination medium where it has started to grow; allow any medium that is attached to the roots to remain. Place the seedling into the pre-dibbled hole. Gently push the root system into the hole. Plant at the same depth as the seedling was growing during germination: Do not bury the seedling deeper or raise it higher. Gently firm the medium around the root system, water thoroughly and place it in a good growing environment for that particular species.
Whether or not to fertilize seedlings at transplanting is a personal choice. If you prefer to fertilize immediately after transplanting, use a starter solution that is half of a standard rate for mature plants of that species. You can also wait a week to 10 days, and then apply at the standard rate.
Asexual propagation
Asexual plant propagation uses vegetative parts of the plant to make a clone, or an exact genetic copy, of the parent plant. This can have several advantages, including the ability to replicate genetically the parent plant. In most cases, it allows for plants to be grown to a size suitable for transplanting in less time than from seed. Also, certain plants produce seeds that are sterile or have poor viability, which makes sexual propagation difficult or impossible.
Gardeners use several general methods to propagate plants asexually. These include taking cuttings, layering, division, grafting, budding and developing new plants from tissue cultures in a lab.
Cuttings
Parts of plants removed from a parent plant and rooted to form new plants are called cuttings. Cuttings can be classified according to the nature of the cutting material removed (herbaceous, softwood, semi-hardwood or hardwood) or the part of the plant removed to form the cutting. For landscape plants, "softwood" refers to new growth in the current season; semi-hardwood is succulent but partially matured tissue from the current season’s growth, usually taken in late summer; hardwood cuttings are taken from woody plants during dormancy in late fall or early winter.
Leaf cutting
Leaf cuttings include only a leaf blade or the blade and a portion of the petiole (Figure 2). Leaf cuttings first must form roots and later shoots. Depending upon the species, it can take several months to produce a plant suitable for transplanting from a leaf cutting.
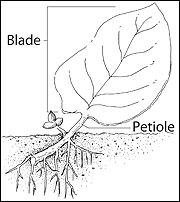 Figure 2. Leaf cutting.
Stem-tip cutting
A stem-tip cutting is one in which the apical meristem and at least one fully expanded leaf is taken from the mother plant (Figure 3). After new roots form, there is already an active meristem waiting to grow, which speeds the process.
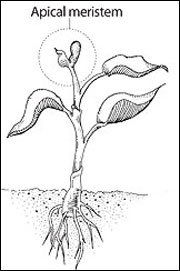 Figure 3. Stem-tip cutting.
Leaf and bud cutting
Leaf and bud cuttings are similar to stem-tip cuttings, but they lack the apical meristem (Figure 4). Instead, dormant buds at the leaf axil, or node, serve as the growing point when the cutting roots. A single stem can yield only one stem-tip cutting, but several leaf and bud cuttings after that.
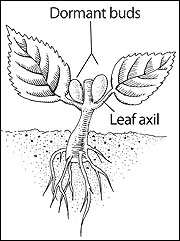 Figure 4. Leaf and bud cutting.
Stem cutting
A section of the stem without leaves, but with dormant buds, is rooted in a porous growing medium (Figure 5). This type of cutting is popular to use with plants that exhibit a cane-type of growth, such as dieffenbachia (dumb cane).
Cuttings should be 4 to 6 inches in length and taken from vigorous, healthy plants. Remove the cutting from the mother plant with a sharp, clean knife. Use a rooting hormone that contains a plant-growth hormone such as IAA, IBA or NAA to improve the rooting percentage and encourage more vigorous roots. Rootone® and Hormodin® are two popular choices that are available commercially. Always use rooting hormones according to label directions.
Cuttings should be placed (stuck) in a propagation medium that retains moisture, yet is porous. Do not allow the medium to dry out. Commercially, moisture is usually provided by a misting system. Home gardeners can use clear plastic bags to accomplish the same goal. After sticking, place the cuttings in a warm location between 75 and 80 degrees F to hasten rooting.
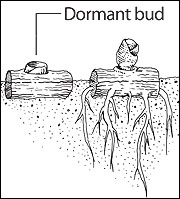 Figure 5. Stem cutting.
Layering
Layering is a method of propagating new plants when seeding, cutting, grafting and other methods are impractical or ineffective. It consists of rooting a new plant while the stem is still attached to the parent plant. Because an entire branch of the parent plant is often needed to form a single new plant, this method is useful for propagating only a few plants from each parent. Layering is simple to perform and can be done without any special equipment or structures. Methods of layering include simple, air, tip and compound.
Simple layering
Simple layering is the easiest for the homeowner and may be performed whenever a plant has a branch low enough to be pulled down to the ground. Bury the branch several inches deep in the soil, making sure the shoot tip protrudes from the soil (Figure 6).
Many plants root when a branch is bent sharply upward. However, it can speed the process to make a wound, or cut, on the stem at the point where it curves upward. Do this with a slanting cut about 2 inches long either above or below the bend and about 12 inches from the tip. Dust the cut with a rooting hormone. Place the prepared branch or stem into a hole or trench 3 to 4 inches deep and secure it with a wooden peg or wire wicket. After the branch has been pinned down close to the point of wounding, bend the tip upward. If the cut was made on the topside, give the branch a half twist. If the branch is stiff, insert a stake next to the shoot to hold the tip in an upright position. Fill the trench and mound the soil slightly so the wounded portion of the stem will be 4 to 6 inches below the soil surface.
This type of layering should be done in early spring on dormant one-year-old shoots. Choose flexible branches that bend easily. Keep the soil around the layer moist at all times, and mulch with straw, leaves or sawdust. The layer may form roots during the first season, but it should not be cut from the parent plant until the following spring. Some hard-to-root plants may take two years to produce roots.
The following spring, after the layer is well rooted, cut off the branch where it enters the soil. Don’t disturb the roots of the layer for two to three weeks after the branch has been severed to give the new plant time to recover. It can then be transplanted to a convenient protected spot or container where it can be tended carefully for one year before moving it to a permanent location.
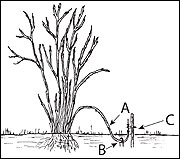 Figure 6. Simple layering. (A) branch. (B) wounded area. (C) staked tip.
Compound (serpentine) layering
Compound layering is suitable for long vines and requires that the shoot be alternately covered and exposed (Figure 7). This technique is simple layering performed multiple times. Wounds should be made on the lower portion of each curve. This method is suitable for vining plants such as honeysuckle, clematis or wisteria. The following spring, after rooting has taken place, the branch is cut into segments at the spots where the branch enters the soil.
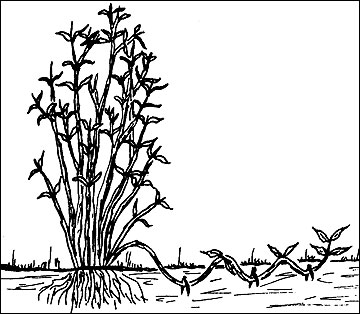 Figure 7. Compound or serpentine layering.
Air layering
Air layering, a popular method of propagating houseplants, involves establishing a root system on the plant’s stem above the ground. The air layer may be made at any point on a stem of proper maturity. On many plants, a good location is about 12 inches from the tip. The procedure for air layering is as follows.
Remove all leaves several inches on either side of the point where the layer is to be made. From the center of the layering area, make a slanting cut upward an inch or more in length and about halfway through the branch (Figure 8). An alternate method of wounding is to remove a strip of bark 1/2 inch to 1 inch wide around the branch. Apply a rooting hormone to the cut or wounded surface. If a cut has been made, do not let it heal back together. Insert a small piece of wood such as a toothpick in the cut to keep the wound open.
Pack about a handful of moist, unmilled sphagnum moss around the branch to cover the wound. Cover the ball of moist moss with plastic wrap. Wrap it around the moss so that the plastic overlaps to keep the moss from drying out (Figure 9). Clear plastic permits you to see when roots have developed. Secure the plastic at each end with tape, string, plant ties or other convenient fasteners. It will usually take a month or more for roots to appear.
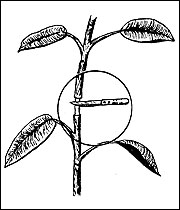
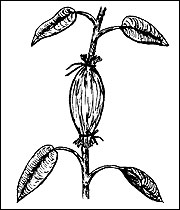 Figure 8. Air layering.
Figure 9. Air layering, with wrap.
Division
Crown division, or division, is one of the best ways to propagate herbaceous perennial plants. Plants such as chrysanthemum, daylily, peony and iris can be divided by this simple, reliable method. Some woody shrubs that branch or sucker from the base can also be reproduced in this way. As a general rule, plants that flower in spring and early summer should be divided in late summer or fall. Those flowering in summer and fall should be divided in early spring before new growth begins.
For crown division, carefully lift plant clumps along with some soil removed from the roots (Figure 10). The crown may then be cut into sections with a knife. Individual growing points (shoots) that contain roots may be used to form new plants, or if a larger plant is desired, several shoots may be left together. When dividing large, old crowns, it is often best to discard the older, center portions and replant the young, more vigorous shoots that have developed on the edges of the clump.
Shrubs may be divided in the same manner, but this should be done when the plants are dormant. Because they are woody, they may need to be separated with a shovel or hatchet. Trim back the shoots before planting and cut off damaged roots.
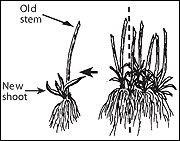 Figure 10. Crown division.
Grafting
Grafting is the act of joining two plants (or their parts) together. The lower part of the graft is known as the understock, or stock, which becomes the root system or part of the trunk. The upper part of the graft is known as the scion and becomes the top of the plant. To make a successful graft, the cambium of the scion must line up as closely as possible with the cambium of the stock and make good, sustained contact. This union must be kept from drying out until the graft "takes." One general rule of grafting is to always note which is top and bottom of a scion stick; a scion will not grow if it is inserted upside down.
Although grafting usually refers to joining only two plants, it may be used to combine several. For example, multiple grafts can be used to produce an apple tree that bears several cultivars of apples or a rose of sharon with different flower colors. Most often grafting is used to attach a more vigorous, hardy stock to an otherwise desirable cultivar. Dwarf plants also can be produced by grafting through the insertion of interstock, or interstem, a piece of the plant that is grafted between the scion and stock, usually to form the trunk or a portion of it.
The best time for grafting is in the spring just as growth starts. Grafting techniques can be divided into four basic types, usually referred to as whip, cleft, bark and side grafting. The method selected is largely determined by the size of the stock and scion.
Whip or bench graft
The whip graft (Figure 11) is fairly easy and is used when the scion and stock are of similar diameter, preferably between 1/4 inch and 1/2 inch. The stock can be either a plant growing in the field or a dormant bare root plant. The stock should be smooth and straight-grained. Do not graft near a point where side twigs or branches have developed. The scion should be year-old wood, preferably the same diameter as the stock. If the stock is larger than the scion, contact can be made on only one side. The scion should never be larger than the stock.
- Preparing the stock and scion
For this technique, the cuts made in both stock and scion should match (Figure 12). On both parts, make a smooth, sloping cut 1 to 2-1/2 inches long depending on the thickness of the material. This first cut should be a single, smooth one with no waves or whittling. - Cutting the stock
Make a slanting cut about 2 inches from the base (start of root system) of the young stock. Although grafts may be made with a simple union of two slanting cuts, the strongest graft results from a whip-and-tongue system. To form the tongue, hold the one-sided, slanting cut facing you and support it with your finger. About one-third of the distance down from the tip of this cut, make a downward cut about 1/2 inch long as close to parallel with the grain of the wood as possible (Figure 13). - Cutting the scion
The cutting procedure should be exactly the same as that for the stock. The only difference is that the cuts are made at the bottom of the scion piece, whereas they were made at the top of the stock. The more similar the cuts on the two pieces, the greater the chance of a successful graft union. - Fitting the stock and scion
After the cuts are made on both parts, push them together tightly enough so that the cut surfaces match as closely as possible (Figure 14). The cambial area immediately under the bark of both pieces must be aligned for a graft union to develop. If the scion and stock are not the same size, match the cambiums on one side only. The lower tip of the scion should not hang over the stock. - Protecting the graft
In most cases, it is best to wrap the graft to maintain contact between cambial areas (Figure 15). Wrap the graft with a rubber budding strip, grafting tape or a plastic adhesive tape. To prevent the graft union from drying, cover the wrapped area with grafting wax as uniformly as possible. In wrapping and waxing, be careful not to dislodge the aligned cambial areas. If the wrapping material does not decay naturally, cut it about a month after growth begins.
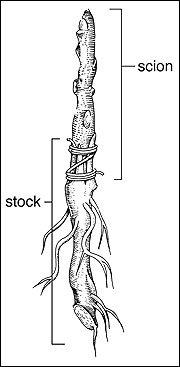
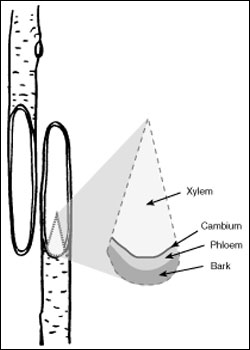 Figure 11. Whip or bench graft.
Figure 12. Preparing the stock and scion for a whip graft.
 Figure 13. Cutting the stock for a whip graft.

 Figure 14. Fitting the stock and the scion for a whip graft.
Figure 15. Wrapping to protect the whip graft.
Cleft graft
The cleft graft (Figure 16) is most commonly used to top work a tree to change the tree from one variety to another. It can be used on either young or mature trees. Young trees may be cleft grafted on the trunk, while older trees are grafted on branches not more than 2-1/2 inches in diameter. Branches fully exposed to sunlight and in the main stream of sap flow produce better results than those in shaded or inactive areas. Grafts on upright branches grow better than those on horizontal branches.
When top working large trees, it is best to graft about half the branches the first year and the remainder of the branches the next. Start with the upper center limbs the first year. The best time to top work is just as growth begins in the spring.
- Preparing the stock
Select a smooth, knot-free, straight-grained section. Saw the branch off at a right angle to the grain. Take care not to tear or split the bark. If the saw cut is not smooth, use a knife to trim off the rough edges. The bark must be tight to form a successful graft. Using a grafting tool, or a heavy knife that can be tapped with a mallet, drive the blade into the stub to split the stock through the center so that a split extends about 2 inches down into the branch (Figure 17). - Preparing the scion
The scion for the cleft graft should be made from year-old wood about 1/4 inch in diameter. It is desirable for a scion to contain three buds and to be long enough that it can be inserted with the lowest bud just above the stock. Always note which is top and bottom of a scion stick; a scion will not grow if it is inserted upside down. Start below the lowest bud, and make a long, smooth cut toward the base (Figure 18). The cut should have a surface about 1 to 1-1/2 inches long. Turn the scion to the opposite side and make a second smooth cut of the same length, ideally so that one side (the side containing the lowest bud) is slightly thicker than the other side (Figure 19). - Inserting the scion
With a grafting chisel or a small wedge, carefully open the crack in the stock wide enough to easily insert the scion (Figure 20). Insert the scion with the thicker side toward the outside with the cambiums in contact (Figure 21). Although maximum contact is obtained with straight positioning, a slight slant may help ensure contact. The best contact point is about 1/4 inch below the shoulder of the stock. After properly positioning the scion, remove the wedge or chisel from the slit. The pressure of the stock against the scion should be greatest where the cambiums touch. When the scion is properly located, the cut surface of the scion wedge should be almost entirely hidden. Two scions are usually inserted in each slit, one at each side, which improves the chance that at least one graft will grow. - Waxing the cleft graft
To prevent drying, the cleft graft should be waxed to cover all cut surfaces (Figure 22). Cracks sometimes develop as the wax sets. Check the wax after a few days and again after several weeks to ensure that all surfaces remain covered. - Caring for the graft
After the graft begins to grow, it will continue to require attention. During the first season, do not prune branches that grow. Grafts that grow vigorously may need to have their tips pinched out to stimulate branching, but never prune heavily.
After the first year, some training and branch selection may be necessary. Do this at the usual pruning time in late winter or early spring. If both scions in a cleft grow, shorten one to allow the other to develop and become dominant. Do not remove the second graft until later; leaving it will help cover the wound faster.
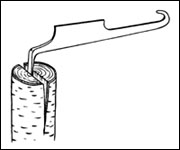 Figure 16. Cleft graft.
Figure 17. Preparing the stock for a cleft graft.
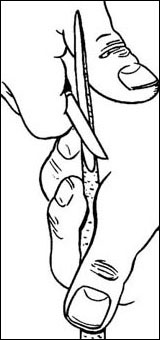
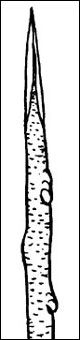 Figure 18. Preparing the scion for a cleft graft.
Figure 19. Cuts on both sides of the scion for a cleft graft form a wedge.
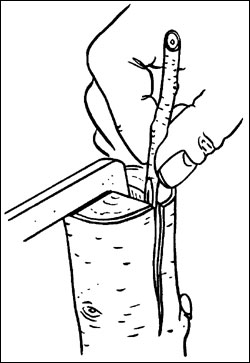 Figure 20. Inserting the scion for a cleft graft.
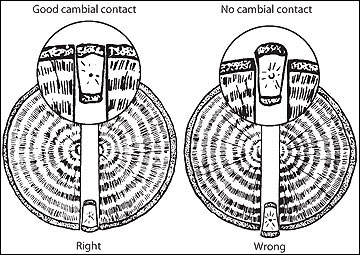 Figure 21. A successful cleft graft depends on good cambial contact.
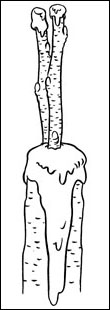 Figure 22. Waxing a cleft graft.
Bark, or veneer, graft
Bark, or veneer, grafting is usually performed on branches ranging from an inch to several inches in diameter (Figure 23).
- Preparing the stock
The branch or trunk is cut off at a right angle in the same manner as described for cleft grafting. The bark graft can be made only when the bark slips or easily separates from the wood. This is usually in early spring as the year’s growth begins. Several techniques can be used on the stock for the bark graft: (a) make a slit in the bark about 3/4 inch long, or (b) make two slits in the bark separated by the width of the scion (Figure 24). - Preparing the scion
The scion should be dormant, so gather deciduous plants before grafting and keep them wrapped in plastic and refrigerated to prevent drying. The scion should be 4 to 5 inches long with two to three buds. Prepare the base of the scion by cutting inward 1-1/2; to 2 inches from the base, then downward, forming a shoulder and long, smooth cut (Figure 25). The long cut should extend about one-third through the twig, keeping its base strong enough to insert but not too thick. On the side opposite the long cut, make a short cut to give the base of the scion a wedge shape for easier insertion. - Inserting the scion
A knife may be used to lift the bark at the top of the slit, but this is not always necessary. Push the scion down and center it in the slit or between both slits if the double slit method is used. Insert the scion until the shoulder rests on the stub (Figure 23). If the scion is large enough, one or two small nails may be used to tighten the scion to the stock. You can also use electrical tape or masking tape to pull the surfaces tight. Sometimes the bark does not split or tear and nailing or wrapping is not necessary. The graft should always be thoroughly protected with wax over all open surfaces to prevent drying.

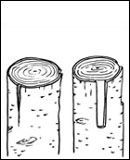
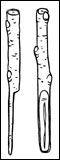 Figure 23. Bark or veneer graft.
Figure 24. Preparing the stock for a bark graft.
Figure 25. Preparing the scion for a bark graft.
Side, or stub, graft
The side, or stub, graft is suitable for plants that are too large for a whip graft but not large enough for easily making a cleft or bark graft. The plant or branch that will serve as the stock should be 1 to 2 inches in diameter. The material for the scion should be about 1/4 inch in diameter.
- Preparing the stock
Select a smooth area near the base. Use a sharp knife to make a slanting cut into the stock (Figure 26). The cut should angle downward and extend about halfway through the branch. - Preparing the scion
The scion should contain two to three buds and be about 3 inches long. Make a wedge at the end of the scion similar to that made for cleft grafting, but make it shorter (Figure 27). It is not necessary to make the cuts more than an inch long. One side should be slightly thicker than the other. As with all grafting cuts, they must be made straight and smooth, with a single movement of a sharp knife. - Inserting the scion
Pull the upper part of the stock back to open the cut. Insert the scion into the open cut with the slightly thicker side lying along the cambium. Set the scion at a slight angle to give maximum contact (Figure 28). When the top is released, the scion should be held in place so that tacking or wrapping is unnecessary. The stock or stock branch should then be cut off about 5 to 6 inches beyond the graft. Also, remove any lateral branches on the stub that might crowd the graft as it begins to grow. To prevent drying, wax the graft carefully so that all cut surfaces are covered. The tip of the scion, as well as any open wounds made by removing lateral twigs on the branch, should also be waxed. After several weeks, when the scion has started growth, the remainder of the stock should be carefully cut closer to the graft (Figure 29), and the new cut should be waxed.
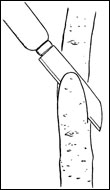
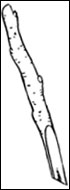
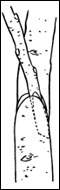
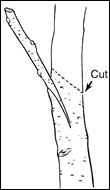 Figure 26. Preparing the stock for a side graft.
Figure 27. Preparing the scion for a side graft.
Figure 28. Inserting the scion in a side graft.
Figure 29. Cutting the extra graft in a side graft.
Budding
Budding is a method of grafting in which the scion is a single bud rather than a piece of stem or twig. Many of the same conditions and materials used for other forms of grafting also apply to budding. It is most frequently used to multiply a variety that cannot be produced from seed. It may also be used for top working trees that cannot be easily grafted with cleft or whip grafts.
T-budding
Budding, particularly T-budding, is faster than any other grafting technique and produces a high percentage of successful unions. Budding is also well adapted to plant shoots less than an inch in diameter. In larger branches, buds may be inserted in vigorously growing twigs near the upper part of the plant. Besides ease and success, budding usually produces a stronger union than those made with other grafting techniques. Because only a single bud is inserted, you can produce several new plants even when scion wood of a new variety is limited.
T-budding can be done almost any time that the bark of the stock slips (easily separates from the wood) and buds are fully developed. Most budding is done from late July to early September. Buds set at this time normally remain dormant until the following spring, which is desirable because young shoots produced in the fall would be subject to winter injury. Spring budding (in March and April) is possible but is less desirable than fall budding.
- Selecting the stock
Young plants selected for the stock must have new, vigorous growth. In early summer, remove any shoots on the lower 6 inches of the trunk. This results in a smooth surface to work on. Most budding of young plants is done 2 to 3 inches above the ground; however, it is possible to bud higher. - Obtaining budsticks
The budstick is a twig, usually from the current season’s growth, that is taken from the plant that is to be propagated (Figure 30). It should be vigorous and healthy with plump, well-developed buds. Buds on the center of the twig are generally better than those near the tip or the base. As soon as the budstick is cut, clip off any leaves; allow about 1/2 inch of the leafstalk to remain as a handle. If possible, use budsticks as soon as they are taken from the tree. Otherwise, they can be stored temporarily in cool, moist conditions. - Preparing the stock
A T-cut is the most common and successful cut to make in the stock for budding (Figure 31). Select a smooth, branch-free location on the stock. Make a vertical cut about 1-1/2 inches long that is parallel with the grain of the wood by drawing the knife upward. After making the vertical cut, make a crosscut to form a T at the top of the vertical cut, giving the crosscut a slightly downward angle to make insertion of the bud piece easier. Cut through the bark but not into the wood. Once inserted, the bud should be placed in about the center of this vertical slit. - Inserting the bud
After making the two cuts to form the T, gently lift the bark at the junction of the two cuts with the knife. To insert, place the base of the bud into the slit at the top of the T cut. Slide the bud down into the vertical slit until the top of the shield is even with or below the cross cut (Figure 32). Leaving the 1/2 inch of leafstalk as a handle can make insertion easier. It is important to insert the buds promptly as soon as they have been cut from the budstick. - Wrapping the bud
After the bud has been placed in the T-cut, it should be wrapped. Rubber budding strips are easy to use. String or twine may also be used. When wrapping, it is best to start above and wrap downward to keep from pushing the bud out if the bark is loose (Figure 33). Make three or four wraps above the bud and three or four below. Finish with a self-binding loop. Try to cover the horizontal cut of the T with one loop of the wrap. Never cover the bud. - Caring for the bud
Check the bud 7 to 10 days after it has been inserted. By that time, you should be able to tell whether or not it has formed a union. If both the bud and the surrounding bark of the bud shield are shriveled and dry, it has not taken. If a union has taken place, the bud and shield will look fresh. If nonelastic wrapping materials were used, cut them off at this time. If elastic wrapping bands were used, they may be cut at any time. Some will deteriorate naturally in a few weeks. In spring, after the bud starts swelling, cut off the stock near the cross of the T.
Occasionally, birds may alight on the developing bud shoot and break it loose before it is completely healed. It is better to cut the stock off 4 to 5 inches above the bud to avoid such breakage. This stub above the bud can be cut back later when the shoot is larger and more durable.
As the bud begins growing, buds from the rootstock may develop shoots. These should be removed as soon as they appear before they are more than 2 to 3 inches long. Do not prune the new branch that has developed from the grafted bud during the first summer. If there is danger of it being broken by wind, it would be better to tie it to a stake or devise other means of support rather than pruning it.

Figure 30. Obtaining a budstick for T-budding.
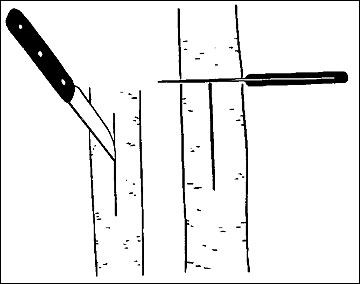 Figure 31. Preparing the stock for T-budding.
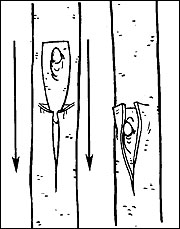
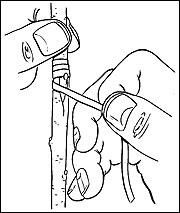 Figure 32. Inserting the bud for a T-bud graft.
Figure 33. Wrapping the bud for a T-bud graft.
Patch budding
Patch budding is a technique that uses a bud with attached bark, instead of a budstick. Patch budding is slower and more difficult than T-budding, but it is used on thick-barked trees (e.g., walnuts and pecans) that can’t be T-budded. For a successful patch bud, it is essential that the size of the bud and its attached bark be the same size as the patch cut on the understock (Figure 34). For this reason, double-bladed knives and other special tools have been devised to make perfectly parallel, horizontal cuts. These cuts are usually done about an inch apart.
- Preparation of budsticks
When preparing for patch budding in late summer, select wood for budsticks about two to three weeks in advance. At that time, cut the leaf blades from the areas to be used, but allow the petioles to remain. Do not cut the budsticks from the tree. The petioles will have dropped by the time the budsticks are used and the leaf scars will have healed over. Then, cut budsticks as needed and keep them moist and protected from direct sun or intense heat. - Removal of the bud patch
To remove the bud from the budstick, use a double-bladed knife to make parallel horizontal cuts equal distances above and below the bud. Then, make vertical cuts about an inch apart at each end of the horizontal cuts. This makes a patch about 1 inch square. Remove this patch from the budstick by pushing sideways. Pulling it from the stick may result in pulling out the center of the bud. If the core of the bud stays on the budstick, the patch bud will not grow. - Preparing the stock
A patch similar to that made for the bud must also be made in a clean, straight-grained portion of the stock. Remove the bark from the stock and promptly insert the patch with the bud. Do both operations quickly, so neither the bud nor the stock has a chance to dry out. While the inserted patch should fit snugly on all four sides, a snug fit is especially important at the top and bottom. - Wrapping the bud patch
Immediately after insertion, wrap the patch. If the bark of the stock is thicker than that of the bud, pare it down so that the bud will not be loose after wrapping. Do not cover the bud during wrapping, but all four cuts must be covered. To hold the bud tight, use heavy cotton string, nursery adhesive tape or masking tape. The edges of the patch must be waxed. Do not allow the wrapping to constrict the bud union. About 10 days after budding, check the buds and release the wrapping by making a single vertical cut on the backside of the stock, away from the bud. Do not try to pull off the wrapping if it sticks to the bud or stock. - Cutting back the stock
As with other forms of budding, do not cut the stock back until the bud union is completed. When the budding is done in fall, do not cut the stock back until growth starts in the spring. If the budding is done in the spring, cut the stock back about 10 days after it has formed a union.
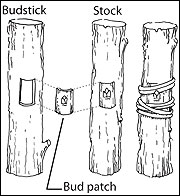 Figure 34. Patch budding.
Tissue culture
Tissue culture, or micropropagation, is the art and science of propagating plants in vitro, which means "within the glass," in this case, a propagation tube. It functions on the principle that plant cells are totipotent (see box).
Tissue culture techniques allow thousands of new plants to be obtained from a single plant, making the technology attractive to rapidly multiply new cultivars. Its limitations include the need for specialized equipment and facilities along with a great deal of highly skilled labor.
The tissue culture process can be divided into four steps or stages: explanting, multiplication, organogenesis and acclimatization.
- Explanting
The piece of tissue (cell or cells) taken from a plant to be used in tissue culture propagation is known as the explant. This often is the apical meristem, but it can be other plant tissue. Explants should only be taken from healthy plants and need to be surface sterilized before use. After sterilization, the explant is placed on the surface of the sterilized medium in the culture tube. - Multiplication
Wounding plant tissue induces cellular division. In tissue culture, the cells of the explant form an undifferentiated mass of cells known as a callus. This callus continues to grow in size during the multiplication stage. - Organogenesis
With time, the callus cells begin to differentiate into distinct tissues that form organs. The callus will first develop a root system; a shoot system will form soon after. At this time a miniature plant can be seen growing in the culture tube with its roots in the culture medium (Figure 35). - Acclimatization
Once the new plantlet becomes large enough to handle, it can be removed from the culture tube and planted in a growing medium. Newly transplanted plantlets are placed in carefully controlled conditions of light, temperature and humidity for several weeks as they adjust to their new environment. Following this period, they are ready to be grown at a greenhouse until they are ready to be transplanted.
When tissue culture was introduced to the horticultural world, it seemed to hold the promise of eventually solving all plant propagation problems as it allowed for the mass production of plants in a short time. This has not proven to be the case. While tissue culture is a viable method of increasing the numbers of a single clone (compared with conventional asexual propagation methods), the success rate for tissue culture depends on the skill of the technician practicing it. The environment created inside the culture tube is ideal for harmful microbes as well as for plant formation. Contamination is a constant problem and leads to disappointing results. Moreover, each plant species has its own special growing requirements. While these have been established for many important horticultural species, there are many more species whose requirements have yet to be determined.
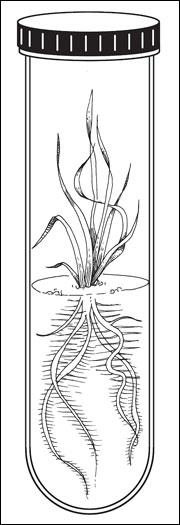 Figure 35. Tissue culture. A plantlet is produced in a culture tube under sterile conditions.
Legal considerations
The U.S. Plant Patent Law was passed in 1930 to encourage the development of new, improved cultivars of asexually propagated plants by allowing them to be patented. The law gives patent holders legal rights to control reproduction of a particular cultivar and to assess a royalty to others who reproduce it for profit. This royalty is meant to provide financial motivation for plant breeders to continue developing improved cultivars of important species. Plant patents are valid for 20 years after the patent application is filed. It is illegal to propagate for personal gain patented plant material without written permission from the holder of the patent rights. This permission takes the form of a legal contract and dictates the royalty to be paid for each propagule, along with other stipulations.
The Plant Variety Protection Act, a similar law passed by Congress in 1970, places restrictions on the reproduction of sexually propagated plants. Before this, one of the few ways plant breeders could profit from their work was to guard the identity of the parents of hybrids. Non-hybrid or "standard bred" cultivars were fair game for anyone to reproduce and use as a seed source for future crops. This is no longer the case. Seed of protected varieties must be purchased from a source approved by the holder of propagation rights. The source will have paid a royalty to the developer for the right to reproduce or sell the variety. If an operator chooses to save seed from a protected variety for future use, he or she must pay a royalty to the holder of reproduction rights.
For further information
- Missouri Environment and Garden newsletter, online at https://ipm.missouri.edu/meg/.
Related websites
- Propagation by Cuttings, Layering and Division, https://pubs.ext.vt.edu/426/426-002/426-002.html
- Plant Propagation, University of New Hampshire, https://extension.unh.edu/sites/default/files/migrated_unmanaged_files/Resource003548_Rep5073.pdf
- PlantPropagation.com, http://plantpropagation.com/