Plant pieces severed from a parent plant and rooted to form new plants are called cuttings. New plants formed from cuttings have the same characteristics as the parent plant. The process of rooting cuttings is simple and inexpensive and requires little labor and equipment.
Types of cuttings
Cuttings of landscape plants are usually made from shoots or stems, but a few may be made from roots. Types of stem cuttings generally used for propagating woody plants are softwood, semi-hardwood and hardwood.
Softwood
Softwood cuttings are used for propagating deciduous shrubs such as forsythia and lilac. Softwood cuttings are generally the easiest to root and don’t require special handling. They are taken from new growth of the current season, while stems are succulent and not yet woody, but mature enough to break when bent sharply. Avoid young, tender shoots. The best months to take softwood cuttings of shrubs are June and July, though some may be taken in August.
Semi-hardwood
Semi-hardwood cuttings are used to propagate broad-leaved evergreens such as holly, euonymus and azalea. The term semi-hardwood is also sometimes applied to partially matured cuttings of deciduous plants. These cuttings are taken during late summer but made from the current season’s growth that has partially matured and is becoming woody.
Hardwood
Hardwood cuttings may be taken from deciduous plants and narrow-leaved evergreens. Cuttings from these plants are taken during the late fall or early winter after a hard frost when the plants have become dormant.
Deciduous plants
Privet, willow, poplar, honeysuckle, grape and spirea are examples of suitable plants for hardwood cuttings. The length of these cuttings may range from 4 to 24 inches, though most are 8 to 10 inches long. Diameter varies from ¼ to 1 inch, depending on the type of material to be propagated.
Narrow-leaved evergreens
Most narrow-leaved evergreens are propagated using hardwood cuttings. These plants include junipers and yews. The cuttings should be taken from terminal shoots of the previous season’s growth and should contain a small portion of year-old wood at the base.
Plants suitable for propagating by cuttings
Many plant species can be propagated by cuttings. Table 1 lists some of these plants and indicates the type of cuttings generally used for each.
How to take cuttings
Select cuttings from vigorous, healthy wood, preferably from the upper part of the plant. Avoid excessively vigorous shoots and weak, spindly growth.
Take softwood and semi-hardwood cuttings during cool parts of the day. Cuttings should be 4 to 6 inches long. For best results, make a slanting cut slightly below a node using a sharp, clean knife. Immediately place cuttings in a plastic bag to avoid excessive wilting.
Remove leaves from the lower half of softwood and semi-hardwood cuttings (Figure 1). Dip the base of the cuttings in a rooting hormone for faster and better rooting. Rooting stimulants are generally available in garden supply stores. Follow the label directions when using these products.
Rooting media
The medium used for rooting cuttings must be clean and sterile. Diseases are a frequent cause of poor rooting and may be contracted from containers, tools, workbenches or rooting media that have not been sterilized.
The rooting medium should not contain fertilizer. Begin fertilizing after cuttings are rooted and have been transplanted to a growing medium.
Clean, coarse construction-grade sand may be used for rooting cuttings. Avoid very fine sand because it has poor aeration, which hampers root formation. A mixture of half sand and half peat moss is a better rooting medium.
Vermiculite, a lightweight expanded mica product, is suitable for rooting cuttings. The horticultural grade, grade 2, is the best size to use and may be used separately or mixed with an equal volume of sand.
Perlite is another excellent propagating material. It is lightweight and provides good aeration to the cutting. Perlite gives best results if mixed with an equal volume of peat moss or vermiculite.
Compressed peat pellets that expand when water is added make a convenient propagation medium and container.
Heavy soils should not be used for rooting. They tend to pack tightly, which results in poor aeration and little or no root formation. They also must be thoroughly sterilized to prevent disease development.
Inserting the cutting
Allow as little time as possible between the time the cuttings are taken and when they are inserted into the medium.
Stick each prepared cutting into the medium up to the remaining leaves. Water thoroughly to settle the medium around the base of the cutting.
Care of cuttings
Do not let the propagation medium dry out during rooting, but avoid excessive watering, which results in poor aeration and death of new roots.
High humidity is necessary because cuttings don’t have a root system. Low humidity allows wilting, scorch, leaf drop or death.
Enclosures help maintain high humidity. If only a few cuttings are to be rooted, use a miniature greenhouse or place individual pots in large plastic bags (Figure 2). Monitor the plastic bags for condensate, and water the medium when condensate disappears. Never place plastic-enclosed containers in direct sunlight because excessive heat will build up. For rooting large numbers of cuttings, use cold frames, hotbeds or greenhouses.
Care of rooted cuttings
The time necessary to form roots differs greatly between plants. Most woody cuttings, such as forsythia, root in several weeks, but hard-to-root cuttings, such as rhododendron, may take three to four months. Check cuttings occasionally by carefully removing a few from the medium. After cuttings have produced some roots at least 1 inch long, they are ready to be transplanted into a growing medium.
The move from high humidity and moist rooting medium to low humidity and drier soil is crucial. Do it carefully. Watch these new plants closely during the first weeks after the move.
If only a few cuttings have been rooted, pot them in individual containers. Larger quantities should be placed in a well-prepared but protected bed or cold frame outdoors where they can be given special care for two growing seasons.
Some plants, such as azaleas and rhododendrons, require special acid soil, but for most plants a mixture of equal parts good topsoil, sand and peat moss makes a good growing medium. Add about 1 cup of an all-purpose garden fertilizer, such as 12-12-12, and two cups of ground limestone to each bushel of mix. Thoroughly mix these into the medium before filling the containers. When no other soil is available, potting soils for houseplants may be used for potting cuttings.
If you use a nursery bed, thoroughly pulverize the soil, and work in 3 to 4 inches of compost, peat moss or leaf mold. Add fertilizer and lime as directed by a soil test.
Install some shade over cuttings during the first growing season. A shade screen can be made from burlap, snow fencing or laths (Figure 3).
Provide protection for young, rooted cuttings during the first winter season. Either mulch them with straw or construct a cold frame around them. Cold frames may be made from concrete blocks or scrap lumber covered with clear plastic, burlap or cheesecloth. If you use plastic, remove it during warm days or cover it with straw to prevent heat buildup.
After two growing seasons in a nursery bed or container, the young plants should be ready to move to permanent locations.
Table 1
Propagation techniques for common garden plants
| Plant | Cutting | Layering | ||||
|---|---|---|---|---|---|---|
| Softwood | Semi-hardwood | Hardwood | Simple | Air | Compound | |
| Abelia | X | X | X | |||
| Althea (Rose of Sharon) | X | X | ||||
| Arborvitae | X | X | ||||
| Azalea | X | X | X | |||
| Barberry | X | X | X | |||
| Birch | X | |||||
| Bittersweet | X | X | X | |||
| Boxwood | X | |||||
| Butterfly bush | X | X | X | |||
| Clematis | X | X | X | |||
| Cotoneaster | X | X | X | |||
| Crape myrtle | X | |||||
| Deutzia | X | X | X | |||
| Dogwood | X | |||||
| Euonymus | X | X | X | X | X | |
| Forsythia | X | X | X | |||
| Hawthorn | X | X | ||||
| Holly | X | X | X | |||
| Honeysuckle (bush) | X | X | X | |||
| Honeysuckle (vining) | X | X | X | X | ||
| Hydrangea | X | |||||
| Juniper | X | X | ||||
| Kerria | X | X | ||||
| Lilac | X | X | ||||
| Magnolia | X | X | X | X | ||
| Mahonia (grape holly) | X | |||||
| Mock orange | X | X | ||||
| Poplars | X | |||||
| Privet | X | X | X | |||
| Pyracantha | X | X | ||||
| Rhododendron | X | X | X | |||
| Rose | X | X | X | |||
| Spirea | X | X | ||||
| Sweetshrub | X | X | X | X | ||
| Viburnum | X | X | X | |||
| Weigela | X | X | ||||
| Willows | X | |||||
| Wisteria | X | X | X | |||
| Yew | X | |||||
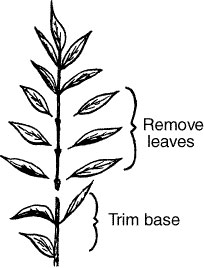 Figure 1
Trim cuttings and remove leaves from lower half of each cutting.
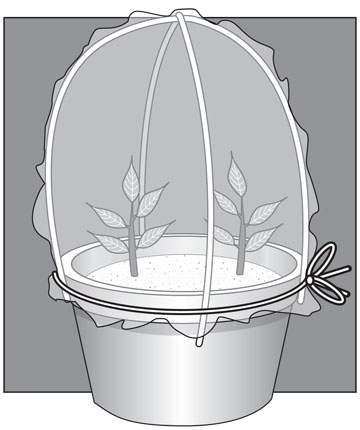
Figure 2
Miniature greenhouse constructed over a large flower pot for rooting a few cuttings.
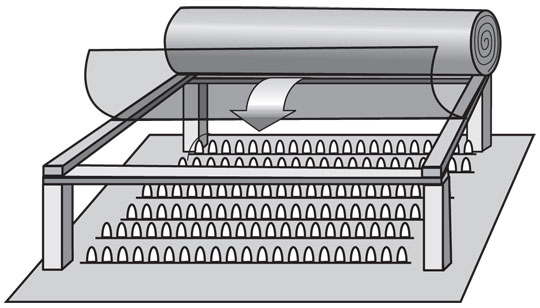 Figure 3
Place a shade screen over newly rooted cuttings outdoors.
Layering
Layering is a method of propagating new plants when seeding, cutting, grafting and other methods are impractical or ineffective. It is the rooting of a new plant while the stem is still attached to the parent plant.
Because an entire branch of the parent plant is often needed to form a single new plant, this method is useful for propagating only a few plants from each parent. For this reason, layering does not lend itself to large-scale commercial production. For home propagation, however, it is a useful and desirable method.
Layering is easy and can be done in the house or garden without any special equipment or structures.
Methods of layering
This section describes four layering methods: simple, air, tip and compound. Table 1 lists plants suitable for layering.
Simple
Simple layering is easiest for the home gardener and may be done whenever a plant has a branch low enough to be pulled down to the ground. Bury the branch several inches deep in the soil, making sure the shoot tip protrudes from the soil (Figure 4A).
Many plants root when a branch is bent sharply upward. However, making a wound or cut on the stem at the point where it curves upward is generally beneficial. To do this, make a slanting cut about 2 inches long either above or below the bend and about 12 inches from the tip (Figure 4B). Dust the wound with a rooting stimulant.
Place the prepared branch or stem into the hole or trench 3 to 4 inches deep, and fasten it down near the point of wounding with a wooden peg or wire wicket. After the branch has been pinned down, bend the tip upward. If the cut was made on the top side, give the branch a half twist to open the wound. A second peg may be necessary to hold the twisted branch in position.
If the branch is stiff, insert a stake next to the shoot to hold the tip in an upright position (Figure 4C). Fill the hole or trench with soil. Mound the soil slightly so the wounded portion of the stem is 4 to 6 inches below the soil surface, then firm the soil.
This type of layering should be done in early spring on dormant 1-year-old shoots. Choose flexible branches that can be bent easily. For some broad-leaved evergreens — such as rhododendron, holly or southern magnolia — layering can be done later in the season after current season’s growth has hardened.
Keep the soil around the layer moist at all times, and mulch with straw, leaves or sawdust. The layer may form roots during the first season but should not be cut from the parent plant until the following spring. Some hard-to-root types may take two years to produce roots.
In spring, after the layer is well-rooted, cut off the branch where it enters the soil. Don’t disturb the roots of the layer for two to three weeks after the branch has been severed to give the new plant time to recover. Then transplant it to a convenient protected spot or container where it can be tended carefully for one year before being moved to a permanent location.
Air
Air layering is one of the most useful methods of propagation for many houseplants, as well as some garden plants. Air layering is used in situations where the stem of a plant cannot be bent to the soil.
Houseplants such as rubber tree are commonly air layered. Air layering is also useful for many tree and shrub species. This technique involves removing a cylinder of bark, treating the cut surface with rooting powder, and covering the wounded section with moist sphagnum moss enclosed in plastic or foil (Figure 5). The moss should be checked regularly for moisture and the layer removed from the mother plant when roots are evident.
Rather than covering with moss, another approach is to cut a pot in half and reattach the two halves around the wounded stem segment before filling with a rooting mixture.
Plants air layered in the spring that have formed roots during the summer should not be removed until they become dormant. These layers should be placed in a container or cold frame where they will get good winter protection.
Tip
Tip layering is generally limited to raspberries and blackberries. It consists of rooting tips of the current season’s growth.
To stimulate more tips, pinch out the top 3 to 4 inches of a cane when it reaches about 2 feet in height. By late August or early September, the new growth will arch down, touch the soil and turn upward. These branches often root without assistance at the point of the curve where they touch the soil.
Rooting can be stimulated in late summer as the drooping canes develop an elongated appearance and leaves become smaller. Pull the tip of such shoots, and insert them in holes 3 to 4 inches deep (Figure 6).
Rooting generally happens quickly, and the plants may be transplanted later in the same season. Plants are more likely to survive, however, when transplanting is delayed until just before growth starts in spring.
Compound
Compound layering is suitable for long vines such as honeysuckle, clematis or wisteria. It requires that the shoot be alternately covered and exposed (Figure 7). The technique is simple layering in multiple, with wounds made on the lower portion of each curve. Cut the branch into segments after rooting has taken place.
Care after rooting
The root systems of newly rooted layers are small relative to the tops. As soon as the newly rooted layers are removed from the parent plant and set in the garden or container, prune them so the leaf area is reduced to about one-third.
Plants outdoors should be shaded lightly during the first season. Suitable shade screens may be made from burlap, lath or snow fencing. After the first winter, the screens can be removed. Enough roots should be developed so that the plants can be moved to a permanent location.
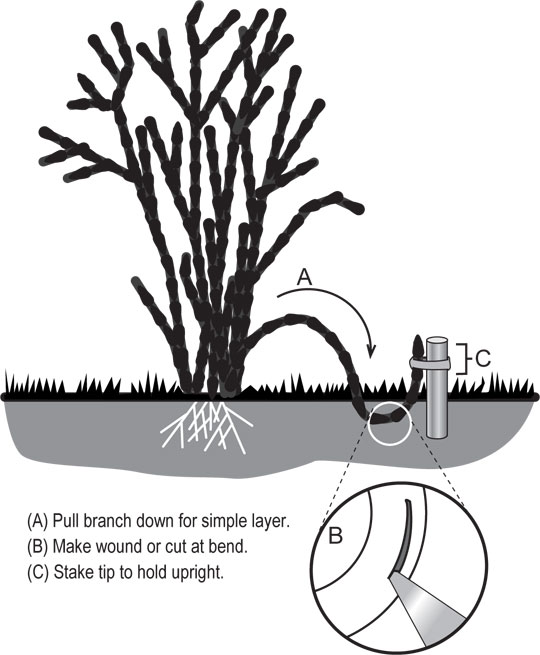 Figure 4
(A) Pull branch down for simple layer.
(B) Make wound or cut at bend.
(C) Stake tip to hold upright.
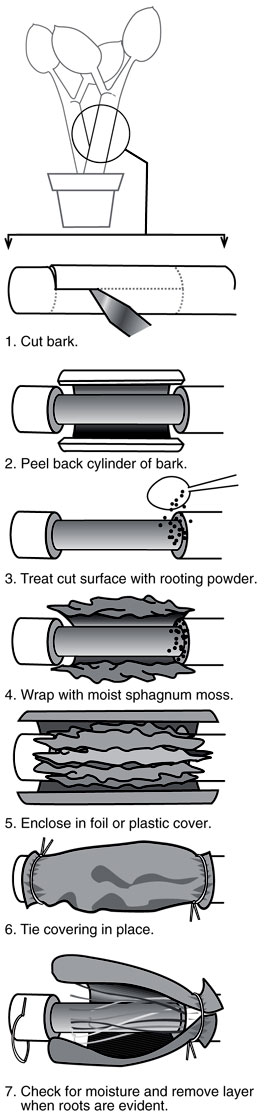 Figure 5
Steps for air layering a plant.
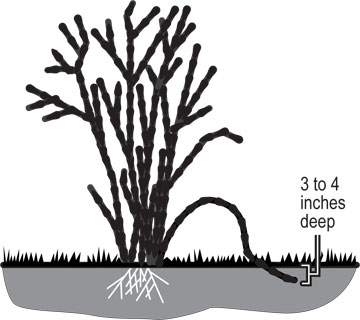 Figure 6
Tip layers are easy to make on raspberries and blackberries.
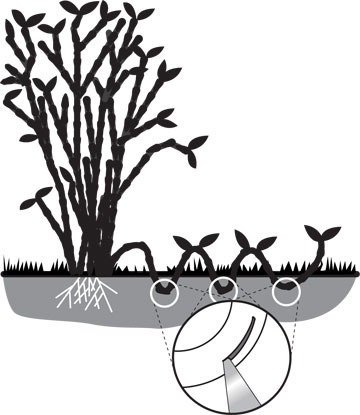 Figure 7
Compound layers are suitable for plants with long stems or vines.
Division
One of the most important methods for propagating plants at home is crown division. Herbaceous plants such as chrysanthemum, day lily, peony and iris can be divided using this method. Table 2 lists common plants suitable for division. Some woody shrubs that branch or sucker from the base can also be reproduced using this simple and reliable method.
Plants that flower in spring and early summer should be divided in late summer or fall. Those that flower in summer and fall should be divided in early spring before new growth begins.
For crown division, carefully lift plant clumps and remove some soil from the roots. Then cut the crown into sections with a knife (Figure 8). Individual shoots that contain roots may be used to form new plants, or for a larger plant, several shoots may be left together. For the best chance of success in dividing large old crowns, discard the older center portions, and replant the vigorous young shoots that have developed on the edges of the clump.
Shrubs may be divided in the same manner, but only when plants are dormant. Because shrubs are often woody, they may need to be separated with a shovel or hatchet. Before planting, trim back the shoots and cut off damaged roots. Shrubs that may be divided include red osier dogwood, summersweet clethra, deutzia, euonymus, hydrangea, kerria, spirea and snowberry.
Original author: Ray R. Rothenberger, Department of Horticulture
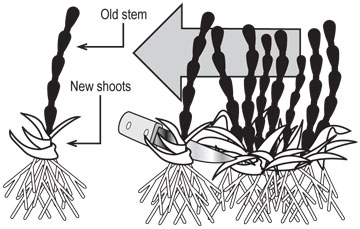
Figure 8
Plant crowns of many perennials may be cut apart to form new plants.