Residential waste stabilization lagoons are commonly used for onsite sewage treatment in Missouri in low-population areas where soils are not suited for conventional absorption field systems. An estimated 30 percent of all housing units in Missouri use onsite wastewater treatment systems. Several surveys throughout the state have shown that 70 percent, or 150,000, of these systems are not functioning properly. Counties in the Missouri Ozarks are particularly at risk.
Human contact with sewage is a serious public health risk. Drinking water contaminated with sewage can cause health problems such as diarrhea, nausea, cramps, dysentery and hepatitis. Exposure to sewer gases can also cause discomfort and illness.
For at-risk areas, connecting to an adequate public sewer system is the most satisfactory and trouble-free method of disposing of domestic sewage from private residences. Where access to a public sewer system is unfeasible or too expensive, proper siting and design of an onsite sewage system is critical to avoid its premature failure. Misuse of individual sewage systems results not only in water quality problems and nuisance conditions, but also in costly repairs to rehabilitate a failing system. Failing systems include both those that you can see and smell and those that seep effluent, or waste liquids, into groundwater supplies before the soil can properly remove disease-causing pathogens.
To reduce public health risks and protect drinking water supplies, state legislation that took effect Jan. 1, 1996, sets minimum construction and permitting standards for onsite sewage systems. Individual counties may adopt stricter standards than those outlined by the state legislation. To ensure compliance with local codes and to reduce their environmental liability, homeowners should consult with their county health department sanitarian or building regulations department prior to construction or repair of any onsite sewage system.
For counties that have adopted the state standards without modifications, homeowners three acres must obtain a county permit before beginning construction of any sewage system. Due to space limitations, lagoons are not generally suitable for lot sizes of less than three acres. A typical residential sewage lagoon is pictured in Figure 1.
 Figure 1
Aerial view of a typical residential sewage lagoon.
How does a lagoon system work?
A lagoon system consists of two components: a septic tank and a small earthen pond with a uniform 3-foot depth. A septic tank is a large, watertight, corrosion-resistant, buried container that receives raw sewage from the plumbing drains of the home. In it, solids are separated out of the raw sewage and are partially digested by anaerobic (oxygen-lacking) bacteria. After primary treatment in the septic tank, liquid effluent flows to the lagoon through a watertight pipe and discharges near the center of the lagoon bottom. Here the wastewater is further processed by aerobic (oxygen-loving) bacteria. Depending on weather conditions, the lagoon may discharge excess liquid, which must be disposed of on the property from which it originates. A grassed area surrounding the lagoon takes up these liquids, minimizing the potential for ground or surface water pollution.
While current state regulations do not require use of a septic tank in the system, its use is strongly recommended and may be required under stricter county ordinances. The septic tank should be large enough to allow retention of the raw sewage for at least 48 hours. Solids that are not digested either float to the top to form a scum layer or settle to the bottom of the tank as sludge. Depending on tank size and sewage volume, the sludge and scum may need to be pumped out every two to five years to allow bacterial digestion to continue in the tank. Otherwise, raw sewage may flow directly through the tank and into the lagoon, possibly creating odors or causing solids to float on the water surface. If a garbage disposal is used in the home, a septic tank is necessary to reduce the amount of fats and solids going to the lagoon.
The process that takes place in a lagoon is a natural one, with microscopic plants and animals coexisting and dependent on each other. This relationship causes the water in the lagoon to turn green with algae at certain times of the year. Sunlight is essential to promote this algae growth. Algae produce oxygen through the photosynthetic process. In this stabilization process, bacteria release carbon dioxide that is used by the algae in their growth process. Another oxygen source is breezes blowing across the lagoon surface. When wastes are broken down, some of the material is given off as gases in the air and small amounts of solids settle to the bottom of the lagoon. In a properly constructed and managed lagoon, solids will not likely build up to where the lagoon will need to be cleaned out.
If properly designed, installed and maintained, a lagoon system can effectively treat household wastewater for up to 30 years. All design and construction must be in accordance with Missouri Department of Health Rule 19 CSR 20-3.060, Minimum Construction Standards for On-Site Sewage Disposal Systems.
Site selection
Lagoons may be used where there are no significant limitations related to groundwater and the soils are known to be impermeable. Soils with percolation rates slower than 120 minutes per inch are considered impermeable. (See "Determining soil suitability" section below.) Many soils in Missouri have a high clay content, making them ideal construction materials for a lagoon. Some soils in southwest and south central Missouri contain a dense soil layer called a fragipan, underlain by extremely porous, cherty gravel and/or fractured bedrock. Use extra care in these soils not to breach the fragipan, or lagoon leakage could easily contaminate regional groundwater.
Figure 2 shows areas where potential groundwater pollution may restrict location of a lagoon. If you live in one of these areas, or if you are not sure of the pollution potential from your proposed system, seek professional help with your site selection. Help is available through your local Department of Health office, MU Extension center, Natural Resources Conservation Service office, or the Missouri Division of Geology and Land Survey in Rolla, Mo.
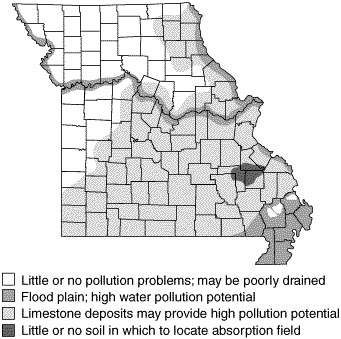 Figure 2
Areas where potential groundwater pollution may restrict location of a sewage lagoon.
Table 1 shows the minimum setback distances that must be observed for septic tanks and lagoons. The 75-foot setback from property lines is measured from the lagoon's nearest shoreline. However, this distance must be increased where necessary to ensure that all effluent is disposed of on the property from which it originates. The discharge end of the lagoon's overflow pipe must be at least 100 feet from neighboring property lines.
On small or restrictive lots, a good way to locate the site for the system is to make a scale drawing of the site, marking out areas that are off-limits according to Table 1 and leaving the remaining open areas as potential system locations.
Table 1
Setback distances for sewage tanks and lagoons
| Minimum distance in feet from: | Sewage tanks1 | Lagoons |
|---|---|---|
| Private water supply well2 | 50 | 100 |
| Public water supply well | 300 | 300 |
| Cistern | 25 | 25 |
| Spring | 50 | 100 |
| Classified stream, lake or impoundment3 | 50 | 50 |
| Stream or open ditch4 | 25 | 25 |
| Property lines | 10 | 75 |
| Property line (from lagoon overflow pipe) | 100 | |
| Building foundation | 5 | 100 |
| Neighboring residence | 200 | |
| Basement | 15 | 100 |
| Swimming pool | 15 | 100 |
| Water line under pressure | 10 | 10 |
| Suction water line | 50 | 100 |
| Upslope interceptor drains | 10 | |
| Downslope interceptor drains | 25 | |
| Top of slope of embankments or cuts of 2 feet or more vertical height | 20 | |
| Edge of surficial sinkholes | 50 | 500 |
| Other soil absorption system except repair area | 20 |
1Includes sewage tanks, intermittent sand filters and dosing chambers.
2Unplugged abandoned wells, or wells with less than 80 feet of casing depth shall have 150 feet minimum setback distance from all above.
3A classified stream is any stream that maintains permanent flow or permanent pools during drought periods and supports aquatic life.
4Sewage tanks and soil absorption systems should never be located in the drainage area of a sinkhole.
Trees and high weeds should be located at least 50 feet from the water's edge. This will allow the lagoon to receive direct sunlight, let breezes help stir oxygen into the water as they blow across the lagoon, and keep leaves from falling into the water, causing sludge buildup. To allow for future development in the area, carefully select the location of the lagoon overflow so that it will be of the least nuisance to both the owner and to neighbors or nearby public properties.
Sites with more than 5 to 7 percent slope (5 to 7 feet of elevation drop per 100 feet of horizontal distance) should generally be avoided for lagoon construction.
Determining soil suitability
With more than 400 different kinds of soils in Missouri, it is likely more than one type will be found on even a small lot. Because many of these soils are unsuitable in their natural state for lagoon construction, two methods — soil morphology evaluations and percolation tests — are commonly used for identifying appropriate soil modifications.
Soil morphology evaluations
Soil morphology evaluations are preferred for sites where soil conditions suggest a potential pollution risk to groundwater. In Missouri, these evaluations may only be done by individuals approved by the Department of Health. This includes soil scientists or persons completing specific schooling and field practice requirements in soil morphology. A current list of qualified soil scientists is available from your county health department sanitarian.
Soil morphology evaluations are done by digging one or more 4- to 6-foot deep soil pits using a backhoe. The soil scientist then examines the soil profile for its texture, color, structure, mottling and rock fragment characteristics in order to locate restrictive horizons. Recommendations on lagoon sealing requirements may be made and, if needed, the methods for diversion of surface and subsurface water flow. The soil scientist will also provide a site plan, showing major topographical features such as streams and drainage patterns and locations for proposed buildings.
Since soils can be quite variable even 50 to 100 feet apart, it is wise to dig several pits for evaluation of the best site. Soil morphology evaluations are preferred in the Missouri Ozarks because they are more reliable, more informative and generally less expensive than percolation tests.
Percolation tests
Percolation, or "perc," tests are best suited for sites that do not have significant groundwater pollution potential. In Missouri, perc tests for sewage systems requiring Department of Health permits may only be conducted by registered engineers, geologists, sanitarians, soil scientists or other persons who have received Department of Health training and certification. If a sewage system permit is not required, you may follow the steps listed in the "Percolation test procedure" section for conducting a percolation test.
A county Soil Survey, available through the USDA Natural Resources Conservation Service office serving your county, can also be useful in identifying restrictive layers.
Note
If your septic tank/lagoon system has not been designed according to the capacities of the soil on the site, the system will not function properly no matter how good the construction.
Percolation test procedure
- Locate a site for the potential sewage lagoon.
- Dig a minimum of four holes — at least three holes around the perimeter of the lagoon site and one in the middle of the site. Holes must be 6 to 8 inches in diameter (all the same diameter), vertical, and to the proposed depth of the trenches (18 to 30 inches deep). No power augers may be used.
- Roughen or scratch any smeared areas of the hole sides and bottoms to provide a natural soil surface for water to penetrate.
- Remove loose material from the holes and add a 2-inch layer of 1/4- to 3/4-inch washed rock into the bottom of holes to prevent scouring when water is added.
- Add 12 inches of water (measured from the bottom of the hole) and maintain that level for a 4-hour presoak period. This saturates the voids between soil particles with water.
Note
Watch the hole for the first 10 minutes. If the 12 inches of water completely drains away in less than 10 minutes you can begin the percolation testing immediately. With this soil, you begin by setting the water level to 8 inches and you can measure every 10 minutes. If 8 inches of water seeps away in less than 10 minutes, use a shorter interval. It may be easier for you to measure the amount of time it takes for water to seep 1 inch. Even with this type of soil, you may not exceed the 8-inch maximum depth.
- Twenty-four hours after the start of the presoak process, you are ready to begin the perc test measurements. This time period is required to allow intrusion of water into the individual soil particles, thus simulating wet soil conditions.
- Adjust the water level in each hole to an 8-inch depth, measured from the bottom of the hole. Start timing.
- At 30-minute intervals, read the drop in water level to the nearest 1/8-inch increment (1/16-inch increments are recommended).
- Replace water up to the 8-inch depth.
- Continue reading at 30-minute intervals, then replacing water to 8 inches above the hole bottom until you have three consecutive readings within 10 percent of the previous reading.
- If the percolation rates of the holes are slower than 120 minutes per inch, the existing soils may be used for construction without modification. If the perc rates are faster than 120 minutes per inch, then a compacted clay liner or synthetic liner will be necessary to provide a proper seal.
Septic tank components
Septic tanks are constructed of many materials, including reinforced concrete, fiberglass or metal. The tank may contain up to three compartments, and it must be watertight to prevent leakage of untreated sewage from the tank that might pollute groundwater and to prevent leakage of groundwater into the tank that could overload the lagoon.
Reinforced concrete tanks, the most common, are built using one of three configurations: mid-seal, top-seal or monolithic cast. The mid-seal tank is cast in two nearly identical halves that are joined together with a sticky, tar-like mastic sealant. The top-seal tank is formed into a one-piece tank portion with a concrete lid secured to the open top with mastic sealant. The monolithic cast tank is factory-formed as one unit, making it more watertight but more expensive than the other two types of concrete tanks.
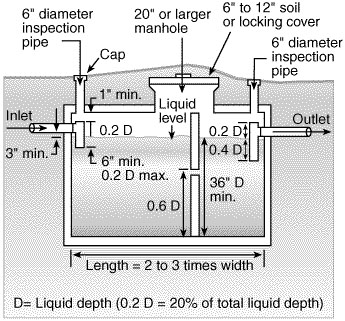 Figure 3
Section view of a concrete septic tank shows the typical components of a reinforced concrete septic tank.
Fiberglass or composite plastic tanks offer a near-perfect watertight seal. These tanks cost more than concrete tanks and require extra care when installing on sites with rocky fill material that could damage the tank.
Metal sewage tanks are not to be used unless specifically allowed by the regulatory agency on a case-by-case basis, and then should be used only if they are covered inside and outside with a bituminous coating.
In all septic tanks, the inlet and outlet pipes should be at least 4-inch diameter Schedule 40 PVC, cast-iron or other approved pipe and be protected by baffles or sanitary tees made of acid-resistant concrete, acid-resistant fiberglass or plastic. The baffles or tees ensure that floating scum from the tank doesn't plug the inlet pipe or flow into the lagoon. Six-inch diameter inspection pipes should be located above the baffles or tees and extend to the top of the ground surface. These pipes are for checking solids levels and clogs and should be capped when not in use. A 20-inch or larger square or round manhole should be installed in the cover of the tank over each compartment to provide access for agitation and cleaning. Extending the manhole riser to the top of the ground surface will simplify cleaning operations. Manhole openings should be covered with tight lids of heavy metal or concrete for safety purposes.
A watertight, 4-inch diameter Schedule 40 PVC pipe should connect the septic tank to the plumbing drains of the home. Slope the pipe 1/4 inch per foot (1/8 inch per foot minimum) toward the tank. Install cleanouts (Figure 4) every 50 feet (100 feet minimum) along the pipe or wherever the pipe turns corners sharper than 45 degrees.
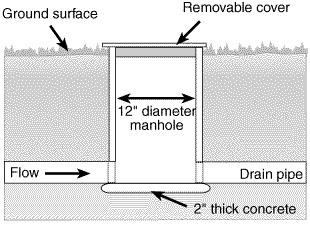 Figure 4a
Manhole cleanout for a drain pipe.
 Figure 4b
PVC pipe cleanout for a drain pipe.
Lagoon specifications
A single-cell lagoon is generally adequate for single-family residences. If one or more secondary cells are used for additional storage or further polishing of the wastewater, they should be at least half the size of the primary cell. If the lagoon will serve more than one residence, a permit may be required prior to construction from the Missouri Department of Natural Resources regional office that serves your county. The lagoon may be round, square or rectangular, but a rectangular lagoon should not have a length of more than three times its width. No islands, coves or peninsulas in the lagoon are permitted.
Vertical separation from the lagoon bottom to creviced bedrock must be at least 3 feet, or a compacted clay liner or synthetic liner must be used. In areas with severe geologic limitations, restrictive layers such as fragipans must be a minimum of 12 inches thick and must not be breached by excavation equipment during construction. Water loss due to percolation cannot exceed 1/8 inch per day (about 70 gallons on a 900 square foot lagoon) to prevent groundwater contamination or nuisance conditions. Subsurface water flows that may damage the lagoon can be diverted by use of a curtain drain ("Interceptor 'curtain' drains" section).
Construction of the berms, or banks, of the lagoon is a big factor in how well it works. All vegetation and organic material should be kept out of the fill material used to build the berms. The inner and outer embankment slopes of the berms should not be steeper than 3:1 (three feet horizontal to one foot vertical) nor flatter than 4:1, to make mowing of the berms easier and to prevent water and soil erosion of the berms. The top width of the berms must be at least 4 feet wide. Freeboard, or the distance from the three-foot operating level to the top of the berms, should be 24 inches (18 inches minimum) to keep surface runoff from entering the lagoon.
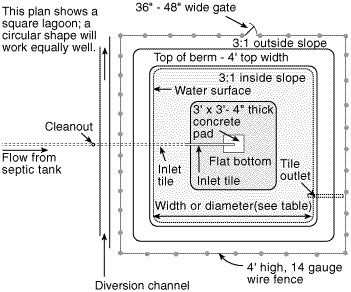 Figure 5
Plan view of a residential sewage lagoon.
Sizing the septic tank and lagoon
Septic tanks come in rectangular, oval or round shapes. The shape of the tank has little to do with its performance, but tank size is important. The tank must retain at least two days (48 hours) of sewage flow from the house; size is based on the number of bedrooms in the dwelling. The retention capacity allows time for solids to properly separate from the liquids before the liquids pass into the lagoon. Table 2 gives a quick match of septic tank size to house size. If the dwelling has a hot tub or whirlpool, it is wise to add one bedroom of capacity for each of these fixtures present.
Table 2
House lagoon system: Septic tank size and lagoon area requirements
| Number of bedrooms | Minimum septic tank liquid capacity1 (gallons) | Lagoon water surface area2 (square feet) | Square lagoons(feet square) | Round lagoons (feet diameter) | Estimated area needed for entire lagoon (square feet) |
|---|---|---|---|---|---|
| 1 to 2 | 1,000 | 9003 | 30 feet | 34 feet | 5,800 |
| 3 | 1,000 | 1,320 | 37 feet | 41 feet | 7,050 |
| 4 | 1,250 | 1,760 | 42 feet | 47 feet | 7,750 |
| 5 | 1,500 | 2,200 | 47 feet | 53 feet | 9,200 |
1For homes with more than five bedrooms, Tank volume in gallons = (1.5 x Daily sewage flow) + 500.
2Add 440 square feet of water surface area for each additional bedroom.
3Minimum lagoon water surface area is 900 square feet at the 3-foot operating level.
These minimum tank sizes will be adequate to handle all household wastes, including water from the toilet and kitchen drains, referred to as blackwater, and water from the bathtub, shower, sinks and laundry, which is called graywater. Larger tanks allow longer intervals between tank clean-out operations.
Lagoon size is determined by the amount of sewage entering it, but it should have a minimum water surface area of at least 440 square feet per bedroom or 900 square feet, whichever is greater, at a 3-foot operating level. When a properly sized septic tank precedes the lagoon, the lagoon water surface area may be reduced by up to 20 percent if approved by the regulatory agency. This size reduction is not allowed if irrigation from the lagoon is required by the regulatory agency. Table 2 shows the dimensions for various sizes of square and round lagoons. Note the larger overall area needed to accommodate the lagoon berms in addition to the water surface area.
Constructing the lagoon
A small bulldozer or bucket-equipped track-loader is the best equipment for building a lagoon. A backhoe should not be used because it is difficult to control the proper lagoon dimensions and uniform soil compaction needed. Construction in the red and yellow clays of the Missouri Ozarks must be done during moist soil conditions or excessive lagoon leakage is likely. The berms should be built in four- to six-inch lifts of moist soil, taking time to compact each layer of soil before adding the next. To ensure an adequate seal in the clay liner on the lagoon bottom, it is important to destroy the original soil structure by repeated compaction and/or disking with rubber-tired equipment, such as a wheel tractor or with a sheepsfoot roller. A 12-inch total thickness of compacted clayey soil on the bottom and up the inside slopes of the lagoon will generally provide an adequate seal.
Where soils are too gravelly or permeable to provide an adequate seal using soil alone, amendments may be added to improve the lagoon seal. Bentonite clay is often effective in sandy and gravelly soils that are lacking enough clay particles and in soils with bright red clays. Soda ash is preferred for the bright red "problem" soils of southern Missouri. If the existing soil requires these materials, it is important to add them at construction time because they generally cannot be added later if leakage occurs.
Where soils are too permeable for even these sealing amendments, a synthetic liner may be used. The liner should be at least 30-mil (0.03-inch) thick and is typically made of laminated rubber compounds. Installation may require the services of a professional liner contractor, although homeowner-installable liners are available. To install such a liner, the soil-shaping portion of the lagoon is completed, then a layer of sand or geotextile fabric is laid down to protect the liner from rock punctures as it is applied over the cushioning layer. Depending on the manufacturer, seams in the liner may be hot-fused or overlapped, and the ends of the liner material may be anchored in a trench dug in the top of the berms around the perimeter of the lagoon.
The drain pipe from the septic tank to the lagoon should be watertight, at least 4 inches in diameter, and of Schedule 40 thickness until 2 feet past the overdig of the tank excavation. From there to the lagoon, pipe with SDR 35 thickness or greater is adequate. Lay the pipe on a firm foundation to maintain a slope of 1/4 inch per foot (1/8 inch per foot minimum) and extend it to discharge into the center of the bottom of the lagoon. The discharge end of the pipe should empty onto a 3-foot square, 4-inch thick concrete splash pad. Provide a cleanout or manhole (Figure 4) near the lagoon berm to allow access for unclogging blockages. The bottom elevation of the cleanout or manhole should be at least 6 inches above the high water level in the lagoon.
Install an overflow pipe in the lagoon bank so that any effluent that discharges is withdrawn from at least 6 inches below the water surface. This can be accomplished either by placing a tee on the inlet end of a level overflow pipe, or by placing the pipe without a tee 8 inches lower on the inside of the lagoon than it is on the outside.
A terraced swale at least 150 feet long is a good way to redirect the overflow to keep it on the property. If these methods are unsuccessful, or whenever there are less than 12 inches of permeable soil over a restrictive layer, use controlled surface irrigation. To use controlled surface irrigation, the pond must either be capable of operating up to five feet deep with 1 foot of freeboard or have a second cell for storage. The appropriate regulatory agency shall approve the method of effluent disposal.
Place a diversion terrace above the lagoon to divert surface water around it. Provide a minimum slope of 4 inches of drop per 100 feet of horizontal distance on the bottom of the diversion terrace to provide positive drainage. See Figure 6 for placement of the various lagoon components. As soon as possible after construction, seed the berms with a locally hardy grass from the outside toe to 1 foot above the water line on the inside slope to minimize soil erosion and simplify weed control.
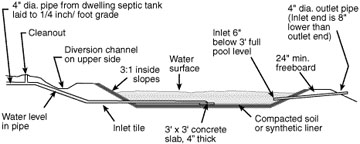 Figure 6
Section view of an aerobic lagoon.
Enclose the lagoon with a 4-foot high or taller fence of welded, woven or chain-link 14-gauge wire to keep out livestock and children. Hog or cattle panels may also be used. Secure the fence wire to pressure-treated wood or galvanized and/or painted steel posts that are spaced not more than 10 feet apart and anchored 24 inches or deeper in the ground. Install a gate large enough (36 to 48 inches wide) to allow access for maintenance and mowing equipment. Post warning signs to designate the nature of the facility.
Interceptor "curtain" drains
A seasonally high water table can "float out" the compacted earthen liner on a lagoon, causing it to leak. To prevent this, curtain drains can be installed to intercept this surface and/or subsurface runoff and divert it around the lagoon.
Curtain drains are dug 12 to 24 inches wide and cut a minimum of 6 inches deep into the top of the restrictive subsurface soil layer at a distance of at least 10 feet upslope of the lagoon. Provide a minimum trench slope of 4 inches of drop per 100 feet of horizontal distance. Perforated pipe (not coiled tubing) is placed in the trench, with the holes pointed upslope toward the perched water table. The trench is then filled with 1-1/2- to 3-inch diameter clean gravel to the same depth as the perched water table, followed by a water-permeable barrier material and earthen backfill. If surface runoff is a concern, completely fill the trench with gravel to the ground surface.
If the site has enough slope, the pipe outlet can be brought to ground level downslope of the lagoon and screened to allow free drainage. On level sites, pumps must be used to remove the collected water. Figure 7a and Figure 7b shows the proper placement of the curtain drain to protect the sewage lagoon.
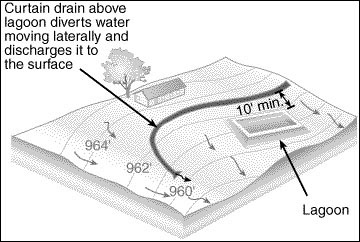 Figure 7a
View of curtain drain location.
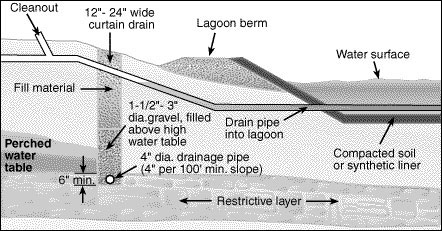 Figure 7b
A curtain drain diverts water around a sewage lagoon.
System maintenance
No starter bacteria or other additives are necessary to put a new lagoon into use. However, it is desirable to have the excavated area fully saturated and the lagoon prefilled with enough water for the solids to stay in suspension. During wet weather, you can prefill by temporarily diverting runoff from a roof or footing drain into the lagoon. During drier weather, you may need to prefill by pumping water from the house water well or nearby pond. Do not allow the lagoon's compacted earthen liner to dry out. After this initial prefill, the lagoon will gradually be filled by the incoming effluent from the home.
Vegetation on the lagoon banks should be mowed often during the growing season to prevent shading and to ensure that breezes can blow across the lagoon water surface to stir in oxygen for proper bacterial action.
The septic tank should be inspected annually to ensure that it is working properly and to determine when scum and sludge in the septic tank should be cleaned out.
Table 3 suggests tips for extending the life of your residential sewage lagoon system.
Table 3
Maintaining your residential sewage lagoon system
| Do obtain necessary permits from the appropriate local agency before doing any construction or repairs. | Don't go down into a septic tank for any reason. Toxic gases in the tank can be explosive and can cause asphyxiation. |
| Do use professional certified installers when needed. | Don't allow anyone to drive or park over any part of the system. |
| Do keep your septic tank and distribution box accessible for pumping and adjustment. Install risers if necessary. The covers should be locked or of sufficient weight to prevent a child from lifting them. | Don't allow the overflow from the lagoon to leave your property, even during wet weather. A grass cover will not only prevent erosion, but will help dispose of excess water. |
| Do have your septic system inspected annually and tank pumped out every 2 to 5 years by a professional contractor. | Don't plant a garden, trees or shrubbery near the lagoon. This could cause shading, sludge buildup and increased odor levels. |
| Do keep a detailed record of repairs, pumpings, inspections, permits issued and other maintenance activities. | Don't make or allow repairs to your lagoon system without obtaining the necessary permits. |
| Do conserve water to avoid overloading the system. Repair dripping faucets and leaking toilets, avoid long showers and run washing machines and dishwashers only when full. Use water-saving features in faucets, shower heads and toilets. | Don't pour into drains any grease, cooking fats, chemical drain openers, paint, varnishes, solvents, fuels, waste oil, photographic solutions, pesticides or other organic chemicals. These materials can upset the bacterial action in the tank or lagoon and pollute groundwater. |
| Do divert other sources of water, such as roof drains, house footing drains, sump pump outlets, and driveway and hillside runoff away from the lagoon system. Use curtain drains, terraces, downspout extensions, retaining walls, etc., to divert water. | Don't use your toilet as a trash can. Keep out coffee grounds, bones, cigarette butts, disposable diapers, feminine hygiene products, paper towels, facial tissues and other materials that decompose very slowly. |
| Do take leftover hazardous chemicals to an approved hazardous waste collection center for disposal. Use bleach, disinfectants and drain and toilet bowl cleaners sparingly and in accordance with product labels. | Don't add enzyme or yeast additives to the septic tank or lagoon in hopes of improving bacterial action. None have been proven beneficial and some actually cause damage to soil and vegetation and may pollute groundwater. |
Troubleshooting
Properly built lagoon systems experience few problems. It is normal for a properly sized lagoon to have a musky odor during warmer weather after prolonged periods of cloudy weather, ice cover or temporary overloading. If odors become offensive, they may be controlled by broadcasting agricultural sodium nitrate or ammonium nitrate at a rate of two pounds per day over the surface of the lagoon until the lagoon turns green and the odor goes away.
A lagoon that was originally built too small or too deep can sometimes be "rescued" by installing a septic tank in the line between the house and the lagoon. This will reduce the nutrient load that the lagoon bacteria must digest. In severe cases, the contents of the lagoon may need to be pumped or dredged out. Then the lagoon should be resealed and refilled with fresh water.
A green covering of algae on the lagoon is normal. However, if duckweed grows and shades more than half of the water surface area, it should be removed. Contact your local MU Extension center for help in plant identification and recommended herbicide control.
References
- 19 CSR 20-3.060, Minimum Construction Standards for On-Site Sewage Disposal Systems, Missouri Department of Health, February 1996.
- On-site Wastewater Treatment and Disposal Systems Design Manual, U.S. Environmental Protection Agency, 1980.
- Pipeline Newsletter, volume 6, number 3, National Small Flows Clearinghouse, 1995.
- Pipeline Newsletter, volume 6, number 4, National Small Flows Clearinghouse, 1995.
- Septic System Owner's Guide, PC-6583-S, Minnesota Extension Service, 1995.