Budding is a method of grafting in which the scion (upper portion of the graft) is a single bud rather than a piece of stem or twig. Many of the same conditions and materials used for other forms of grafting also apply to budding
Budding is most frequently used to multiply a variety that cannot be produced from seed. It is a common method for producing fruit trees, roses and many varieties of ornamental trees and shrubs. It may also be used for topworking trees that can't be easily grafted with cleft or whip grafts. The stone fruits, cherry, plum and peach, are examples of the latter.
Why propagate by budding?
Budding, particularly "T" budding, is faster than any other grafting technique. With a little practice, the right conditions and compatible plants, the percentage of successful unions can be high. Experienced budders may get 90 to 100 percent take. Even for the beginner, the percentage of successful unions is usually greater than with other forms of grafting. Budding is also well adapted to plant shoots from 1/4 to 1 inch in diameter. In larger branches, buds may be inserted in vigorously growing twigs near the upper part of the plant.
Besides ease and success, a stronger union is formed than those made with other grafting techniques. Because only a single bud is inserted, you can produce a number of new plants even when scion wood of a new variety is scarce.
When is the time to bud?
"T" budding can be done almost any time that the bark of the stock slips (easily separates from the wood) and buds are fully developed. Most budding is done from late July to early September (fall budding). Buds set at this time normally remain dormant until the following spring. In cold climates, bud growth in fall is undesirable because young shoots are subject to winter injury. Fall budding is the most common technique for producing fruit trees. Spring budding (in March and April) is possible but is less desirable than fall budding. Another process called June budding is best suited to climates with relatively long growing seasons. Beginners should select fall budding.
How should stock be prepared?
Young plants selected for the understock must have new, vigorous growth. In early summer, take off any shoots on the lower 6 inches of the trunk. This gives you a smooth surface to work on. Most budding of young plants is done 2 to 3 inches above the ground; however, it is possible to bud higher.
What are budsticks?
The budstick is a twig, usually from the current season's growth. It is taken from the plant of the desirable variety to be increased. It should have average vigor, be healthy and have plump, well-developed buds. Buds on the center of the twig are generally better than those near the tip or the base (where the twig may have branched from another limb).
As soon as you cut the budstick from the tree or shrub, clip off the leaves; allow about 1/2 inch of the leafstalk to remain as a handle. Use budsticks as soon as they are taken from the tree but, if necessary, they may be stored in cool, moist conditions.
 Figure 1.
Budstick with leaf petioles attached. The method for removing buds from the budstick is described in the text.
 Figure 2.
Bud with wood attached. Note the very straight cut.
How should buds be selected and prepared?
As with other forms of grafting, a very sharp knife is important. Special budding knives are available that can be used for making the cuts and lifting bark for easy bud insertion. To cut a bud from the budstick, start 1/2 to 3/4 inch below the base of the bud (Figure 1). Make a smooth, slicing cut upward that extends 1/2 to 3/4 inch above the bud. As you finish the cut, bring the knife upward to release the bud. You must cut the wood (shield) attached to the bud straight (Figure 2). Beginners often remove buds with a slightly curved cut. A curve in the shield (wood attached to the bud) makes poor contact and most likely will not form a union. When you cut the bud from the budstick, you must immediately insert it into the understock before either dries out. Any drying or debris on the bud shield can result in failure. Some budders remove the wood from the shield, leaving only the bark and bud for insertion. However, beginners will be more successful if they leave the wood on the bud piece.
How should the understock be prepared?
The most common and successful cut made in the understock for budding is the T cut. Select a smooth, branch-free location on the stock. Make a vertical cut parallel with the grain of the wood by drawing the knife upward (Figure 3, left). The cut should be about 1-1/2 inches long. Position this cut so the bud will fall in the proper location. Remember that once inserted, the bud should be placed in about the center of this vertical slit.
After making the vertical cut, make a cross cut which forms a T at the top of the vertical cut (Figure 3, right). Make the cross cut at a slightly downward angle to make insertion of the bud piece easier. Cut through the bark but not into the wood.
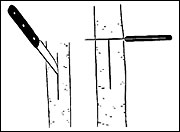 Figure 3.
Forming a "T" cut in the stock.
 Figure 4.
Slide the bud into the vertical slit until the top is even with or below the cross cut.
How is the bud inserted?
After making the two cuts to form the T, gently lift the bark at the junction of the two cuts with the knife. However, if the bark is slipping properly, this step may not be necessary.
To insert the bud, place the base of the bud shield into the slit at the top of the T cut. Slide the bud down into the vertical slit until the top of the shield is even with or below the cross cut (Figure 4).
Leaving the 1/2 inch of leafstalk as a handle can make insertion easier. However, with experience, buds can be inserted without it. Prompt insertion as soon as the buds have been cut from the budstick is important.
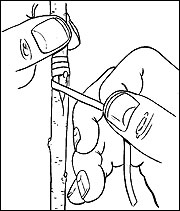 Figure 5.
Wrap the bud tightly with a budding rubber.
How should the bud be wrapped?
After the bud has been placed in the T cut, it should be wrapped. Rubber budding strips are common and easy to use. However, string or raffia may also be used. You can start either above or below the bud, but generally it is better to start above and wrap downward to keep from pushing the bud out if the bark is loose (Figure 5). Make three or four wraps above the bud and three or four below. Finish with a self-binding loop. Try to cover the horizontal cut of the T with one loop of the wrap. Never cover the bud.
What care does the young bud require?
Check the bud one week to 10 days after it has been set. By that time, you should be able to tell whether or not it has formed a union. If both the bud and the surrounding bark of the bud shield are shriveled and dry, it has not taken. You may have time to graft another bud on the stem. If a union has taken place, the bud and shield will look fresh. If non-elastic wrapping materials were used, cut them off at this time. If elastic wrapping bands were used, they may be cut at any time. Some will deteriorate naturally in a few weeks.
In spring, after the bud starts swelling, cut off the stock near the cross of the T. Occasionally, birds present a problem. They may light on the developing bud shoot and break it loose before it is completely healed. In such situations, it is better to cut the stock off 4 to 5 inches above the bud to avoid such breakage. This stub above the bud can be cut back later when the shoot is larger and more durable.
As the bud begins growing, buds from the rootstock may develop shoots. They should all be removed as soon as they appear before they are more than 2 to 3 inches long.
Do not prune the new branch that has developed from the bud during the first summer. If there is danger of it being broken by wind, it would be better to tie it to a stake or devise other means of support than prune it.
What is patch budding?
Among the several budding techniques, patch budding (Figure 6) and T budding are the most frequently used. Patch budding is slower and more difficult than T budding, but it is useful on thick-barked trees that can't be T budded. In Missouri, patch budding is suitable for walnuts, pecans and their relatives.
 Figure 6.
Overview of performing a patch bud.
For successful patch budding, both the bark of the understock and the budstick must slip easily. This form of budding is most often done in late summer or early fall, but you can do it in the spring as soon as the bark slips. It is best to have the budstick and understock about the same size in diameter, although it is possible to place a patch bud on stocks as large as 4 inches in diameter.
For a successful patch bud, it is essential that the size of the bud and its attached bark be the same size as the patch cut on the understock. For this reason, double-bladed knives or other special tools have been devised to make perfectly parallel horizontal cuts. These cuts are usually about an inch apart.
How should the bud be prepared for patch budding?
When you prepare for patch budding in late summer, select wood for budsticks about two to three weeks before you plan to do the budding. At that time, cut the leaf blades from these areas. Allow the petioles to remain. Do not cut the budsticks from the tree. By the time you plan to do the budding, the petioles will have dropped or are easily removed, and the leaf scar will have healed over. Cut these budsticks as needed and keep them moist and protected from direct sun or intense heat.
To remove the bud from the budstick, use the double knife to make parallel horizontal cuts equal distances above and below the bud. Then, make vertical cuts about an inch apart at each end of the horizontal cuts. This makes a patch about 1 inch square. Remove this patch from the budstick by pushing sideways. If you pull it from the stick, you may pull out the center of the bud. If the core of the bud stays on the budstick, the patch bud will not grow.
How should the understock be prepared for patch budding?
A patch similar to that made for the bud must also be made in a clean, straight-grained portion of the understock. Remove the bark from the understock and quickly insert the patch containing the bud. Do both operations quickly, so neither the bud nor the understock has a chance to dry out. The inserted patch should fit snugly on all four sides. Cut the patch in the understock before the patch-bud is removed from the budstick. It is more important that the patch fit snugly at the top and bottom than the sides; however, a snug fit on all four sides is best.
How should the patch bud be wrapped?
Immediately after insertion, wrap the patch. If the bark of the understock is thicker than that of the bud, pare it down so that the bud will not be loose after wrapping. Don't cover the bud during wrapping, but all four cuts must be covered. Nurserymen's adhesive tape or masking tape are sometimes used. Heavy cotton string may also be used to hold the bud tight, but the edges of the patch must be waxed.
Don't allow the wrapping to constrict the bud union. About 10 days after budding, check the buds and release the wrapping by making a single vertical cut on the back side of the understock away from the bud. Do not try to pull off the wrapping if it sticks to the bud or understock. You only want to release tension.
How should the understock be cut back?
As with other forms of budding, don't cut the stock back until the bud union is completed. When the budding is done in fall, don't cut the stock back until growth starts in the spring. If the budding is done in the spring, cut the stock back about 10 days after you inserted the bud and it has formed a union.